Database > RDS for MS-SQL > Console User Guide
DB Instances
On the DB Instances tab, you can create, modify, or delete database (DB) instances, or query status information of created DB instances.
Create a DB Instance
To create a DB instance, click Create DB Instance on top left of the list to go to page for DB instance creation. Enter specifications, information, network, floating IP, DB security group, and backup settings for the instance, click Create DB Instance and send a request for creation.
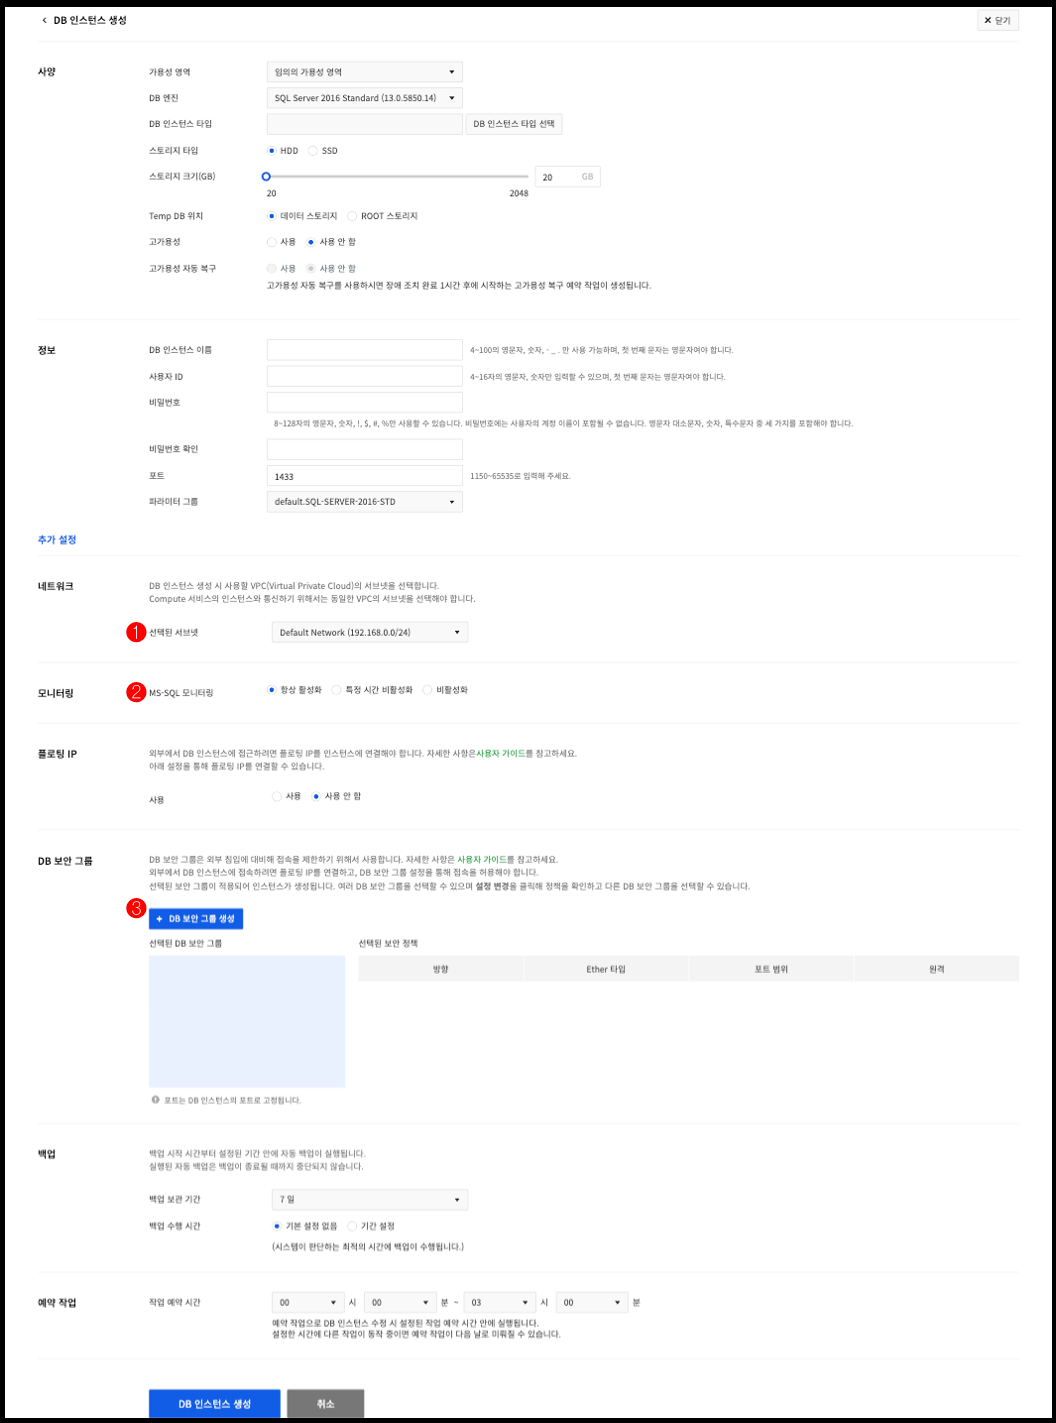
- ❶ From Compute & Network, select a created VPC subnet.
- ❷ Select whether to activate MS-SQL monitoring.
- ❸ When a DB security group is not available, click Create DB Security Group to immediately create and apply a security group.
- For more details, see DB Instance and Database Access.
With a DB instance successfully created, you're automatically moved to the list of DB instances. It takes a few minutes, or up to a few dozens of minutes, to create a DB instance.
List of DB Instances
Brief information of DB instances can be listed. One page shows up to 50 DB instances on the list.

- ❶ Search is available by the name or UUID of a DB instance.
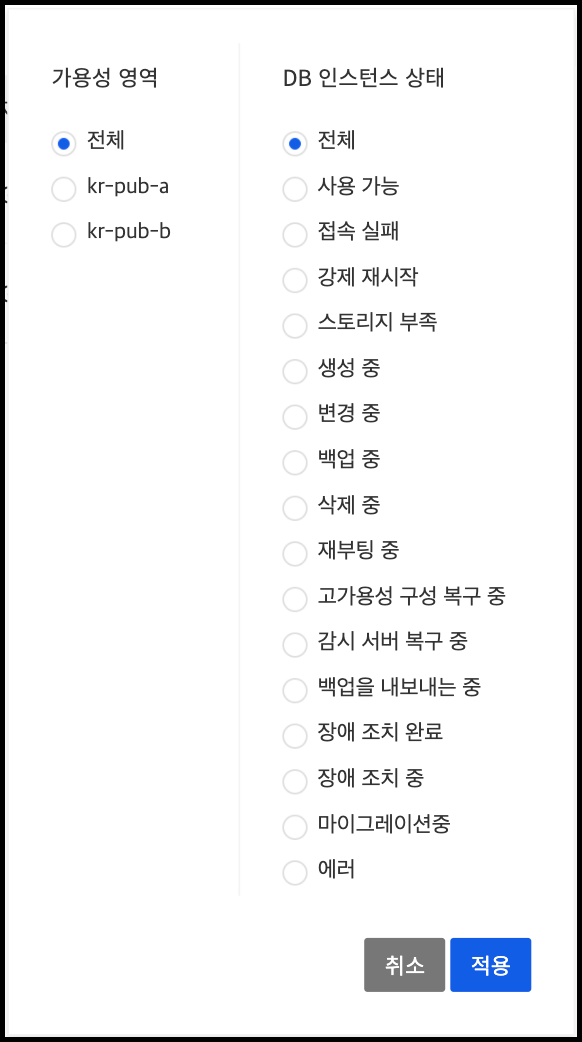
- ❷ With a click on the condition, search results can be filtered by availability zone or DB instance status.
- ❸ Frequently used tasks can be performed.
- ❹ Not frequently used additional tasks can be performed.
- ❺ Pages can be navigated when the current list is refreshed or there are 50 DB instances or more.
- ❻ The button is exposed when the instance is a target for hypervisor maintenance. Refer to Appendix 1 for how to perform migration.
- ❼ The button is exposed when the parameter group has been changed but not applied yet. You can apply the parameters by clicking the button.
- ❽ The button is exposed when point-in-time restoration is not available due to failover or loss of log backups. By clicking the button, you can create auto backups and enable point-in-time restoration.
- ❾ Current CPU usage and number of active sessions. The value is updated every minute.
- ❿ The DB instance status. Different status values and colors appear depending on the status. A spinner appears if the DB instance is in operation.
Restart a DB Instance
Microsoft SQL Server process for the DB instance can be restarted. DB instances can be restarted using failover while using the high availability feature.
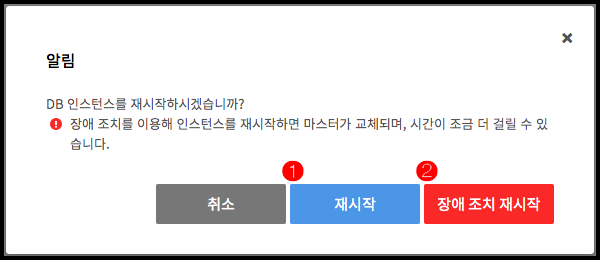
- ❶ If the DB instance is restarted, it will restart the Microsoft SQL Server process. If the Microsoft SQL Server process fails to be restarted, the DB instance VM is rebooted.
- ❷ With the high availability feature, failover can also be used to restart instances.
Force Restart a DB Instance
If the status of the DB instance is determined to be abnormal, it may restart regardless of the current operation.
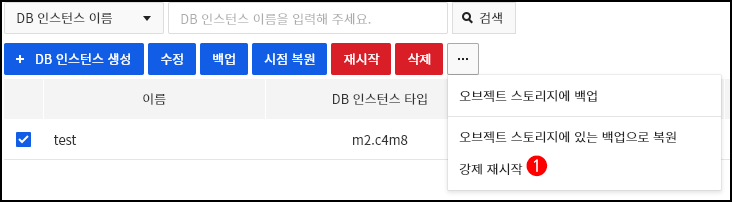
- ❶ When the Force Restart button is clicked after selecting a DB instance, the Force Restart confirmation window appears.
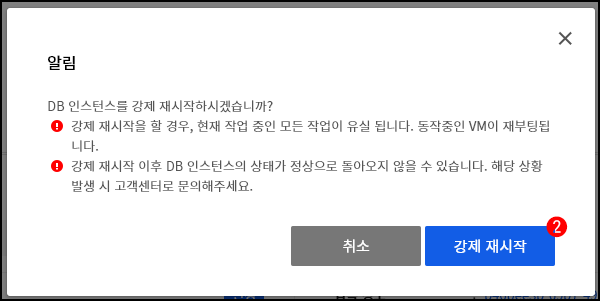
- ❷ When the Force Restart button is clicked, the DB instance gets forced to restart.
[Caution] If you force restart, all the tasks you are currently working on will be lost. Any active VMs will reboot. After a force restart, the DB instance may not return to a normal state. In that case, please contact our Customer Center.
Modify a DB Instance
Available DB instances can be easily modified in the setting via web console.
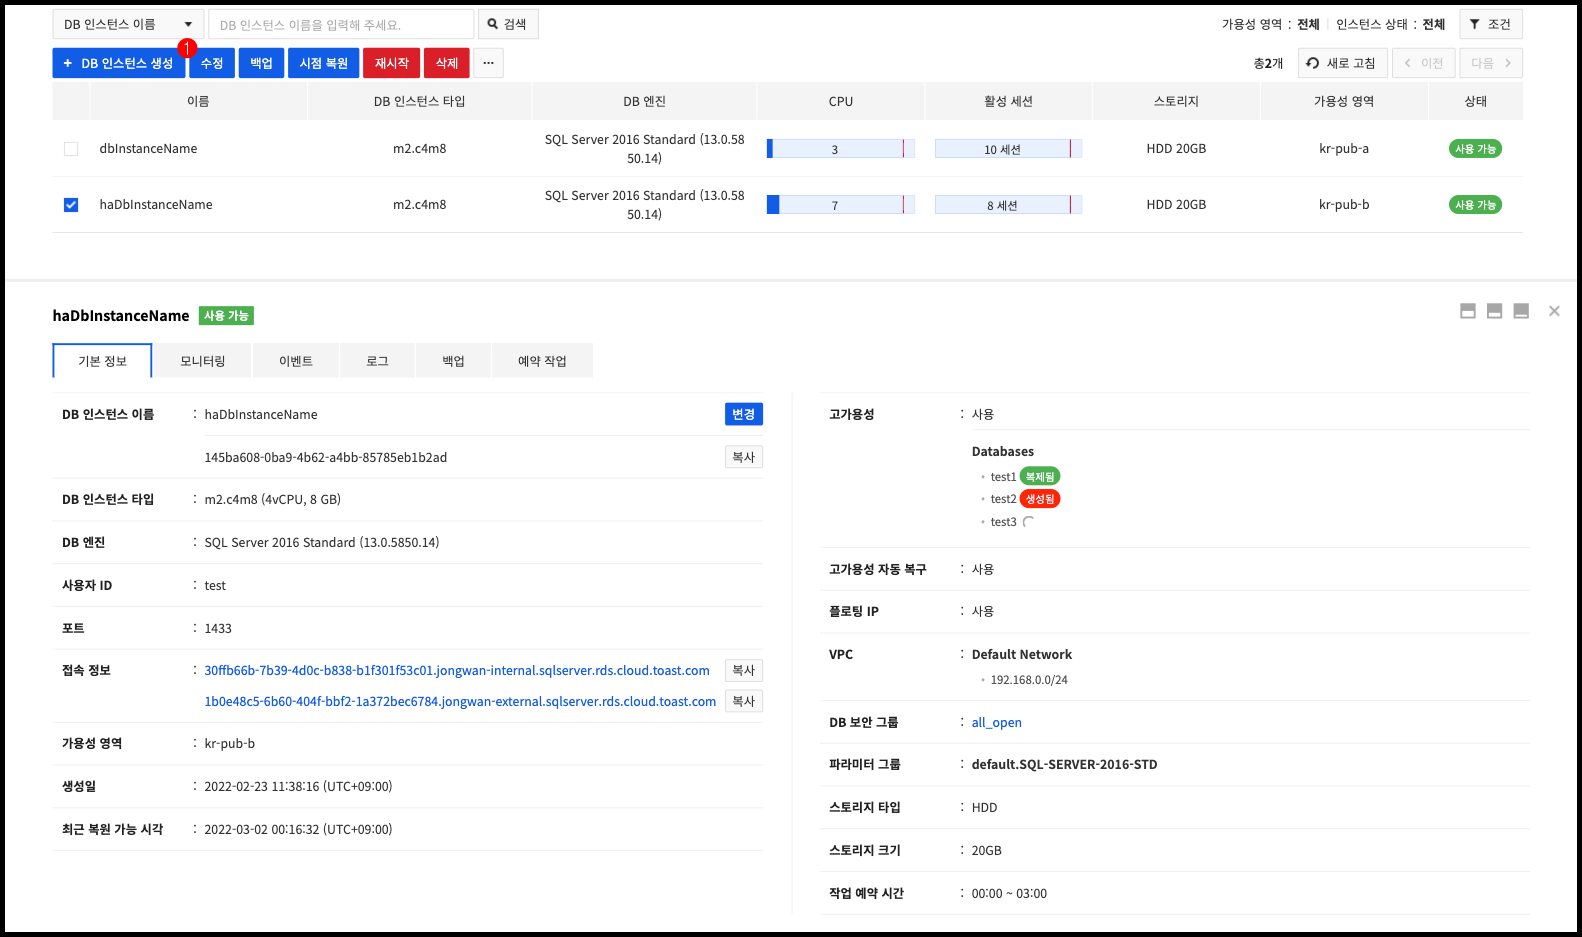
- ❶ Select a DB instance to modify from the list and click Modify on top right.
After setting is changed, click Modify at the bottom of the page to modify a DB instance. Once request for modifying a DB instance is successfully made, you're moved to the list of DB instances. It takes a few minutes, or up to a few dozens of minutes, to modify a DB instance.

- ❶ The availability zone cannot be changed.
- ❷ When the DB instance type is changed, database is restarted.
- ❸ The storage type cannot be changed.
- ❹ The storage capacity cannot be reduced once it is increased.
- ❺ When the temp DB location is changed, the database is restarted.
- ❻ To use the high availability feature, the backup retention period must be set to 1 day or longer.
- ❼ If the high availability auto recovery is enabled, a scheduled task for high availability recovery that runs one hour after the completion of automatic failover is created.
- ❽ The user ID cannot be changed.
- ❾ Without entering the password, settings cannot be changed.
- ❿ When the port is changed, database is restarted.
- ⓫ The VPC cannot be changed.
- ⓬ When the MS-SQL monitoring option is changed, database is restarted.
- ⓭ If you modify the task schedule time, the schedule time of the already created scheduled task is also changed.
- ⓮ If you click Modify DB Instance, a confirmation window for DB instance modification appears.
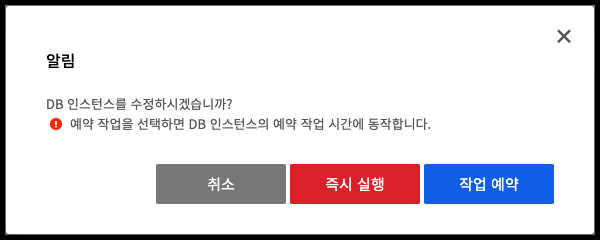
- If you click Run Immediately, it is changed immediately.
- If you click Schedule Task, a task is scheduled at the task schedule time of the DB instance.
DB Instance Details
Select a DB instance to display details view panel at the bottom of the page so that you can check detail information. The details view panel consists of 5 tabs, providing more data related to each DB instance.
Basic Information
You may check basic information of a selected DB instance.
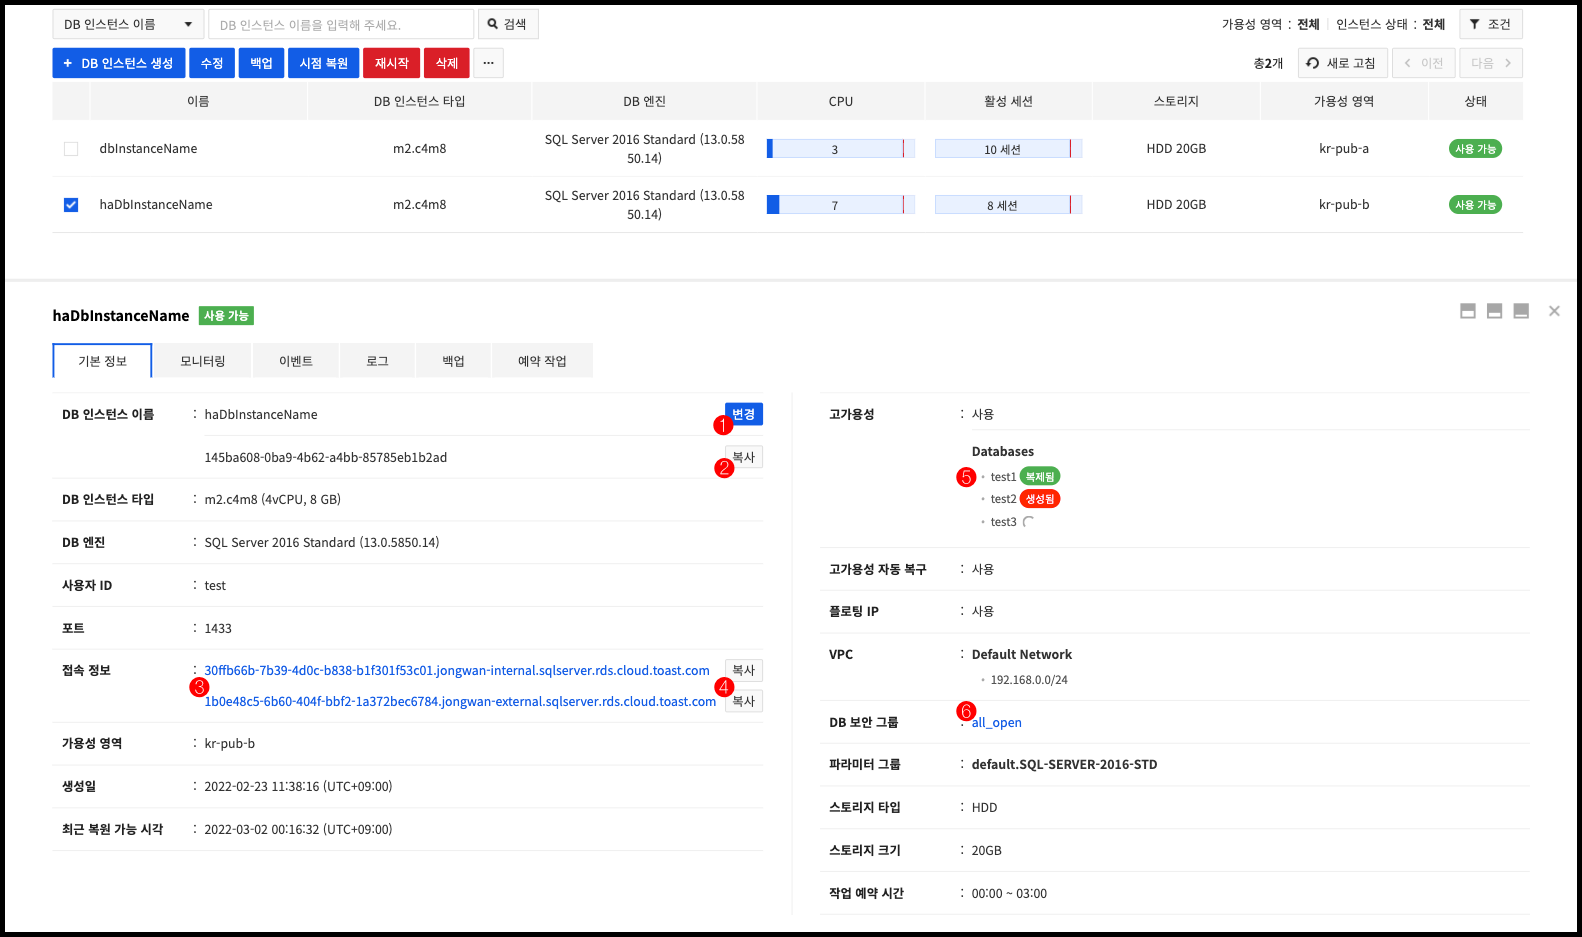
- ❶ Click Change to change name of a DB instance.
- ❷ Click Copy to copy ID of DB instance onto clipboard.
- ❸ A domain capable of accessing the DB instance gets exposed. You can click the domain to see the domain type and IP information.
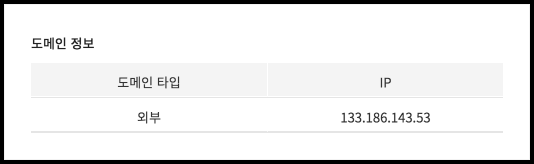
- ❹ Clicking the Copy button will copy the domain information into the clipboard.
- ❺ Shows the database replication status of a high availability DB instance.
- It takes some time for the database to be exposed to the web console after its creation.
- Failover is not performed for databases of which status is not 'replicated'.
- ❻ Shows the security group of the applied DB. Hover the cursor over a DB security group name to see its security group rules.

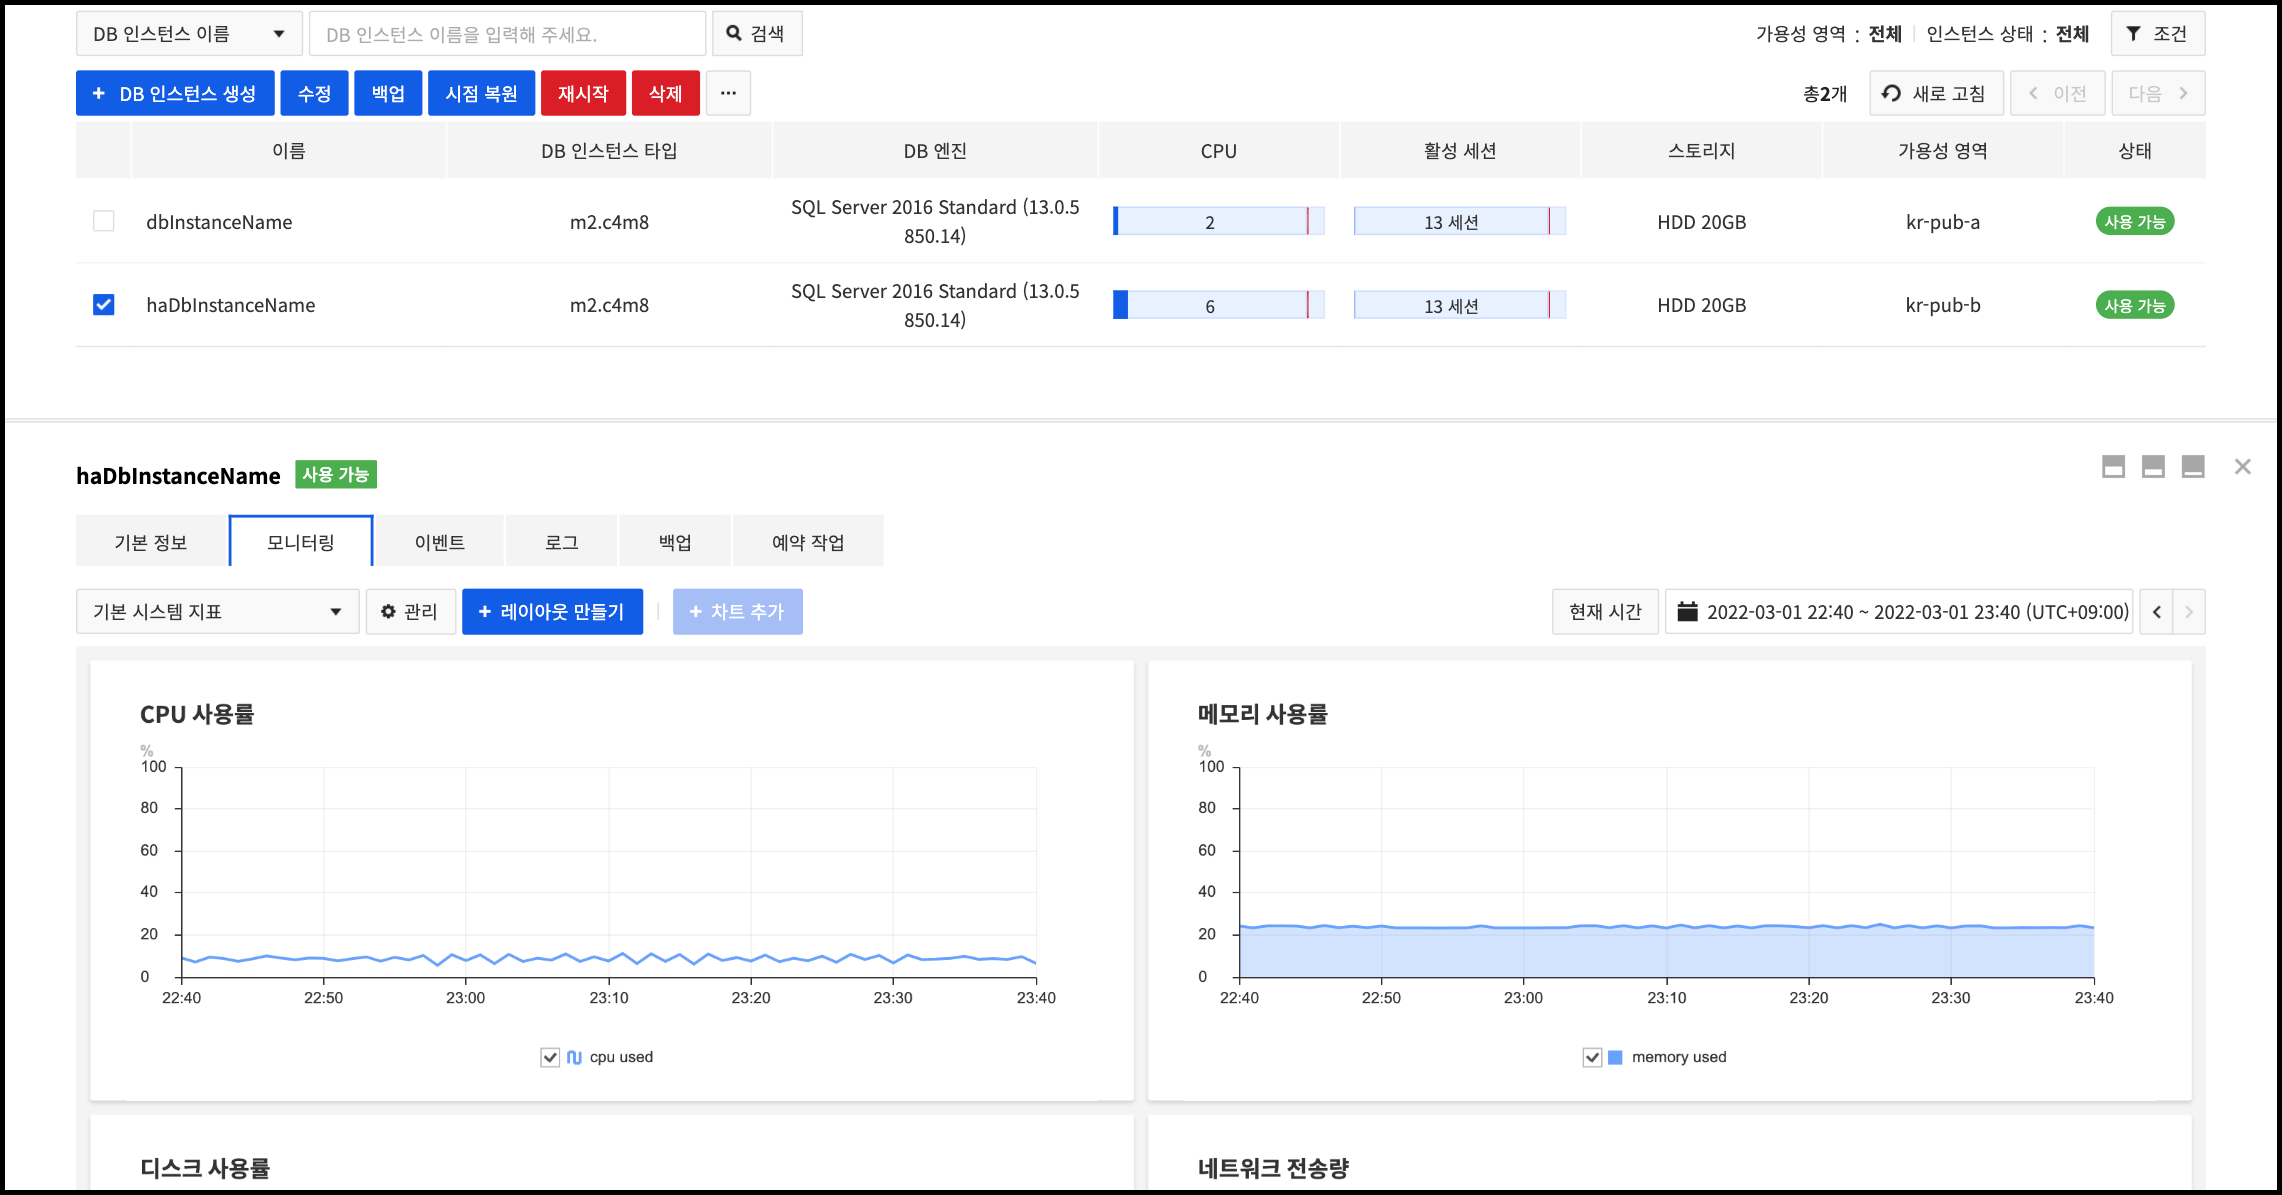
Monitoring
Find out relevant metrics of a selected DB instance on a chart. For more detail usage, see Server Dashboard.
Events
Check out relevant events of a selected DB instance. For more details, see Events.
Logs
Find out error logs of Microsoft SQL Server occurred at a selected DB instance. Error logs are aligned in the latest time order, with 10 lines of logs on each page.
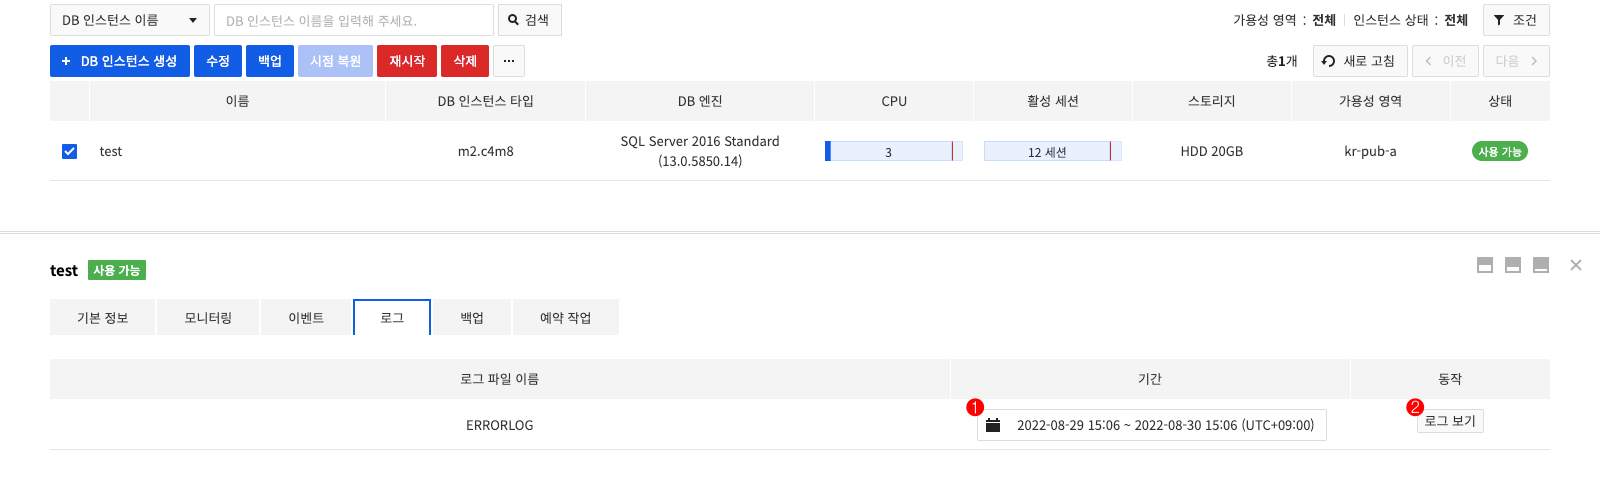
- ❶ Select a period to query. Without a period specified, the recent week's error logs shows up.
- ❷ Click View Log to check the most recent logs for the log file.
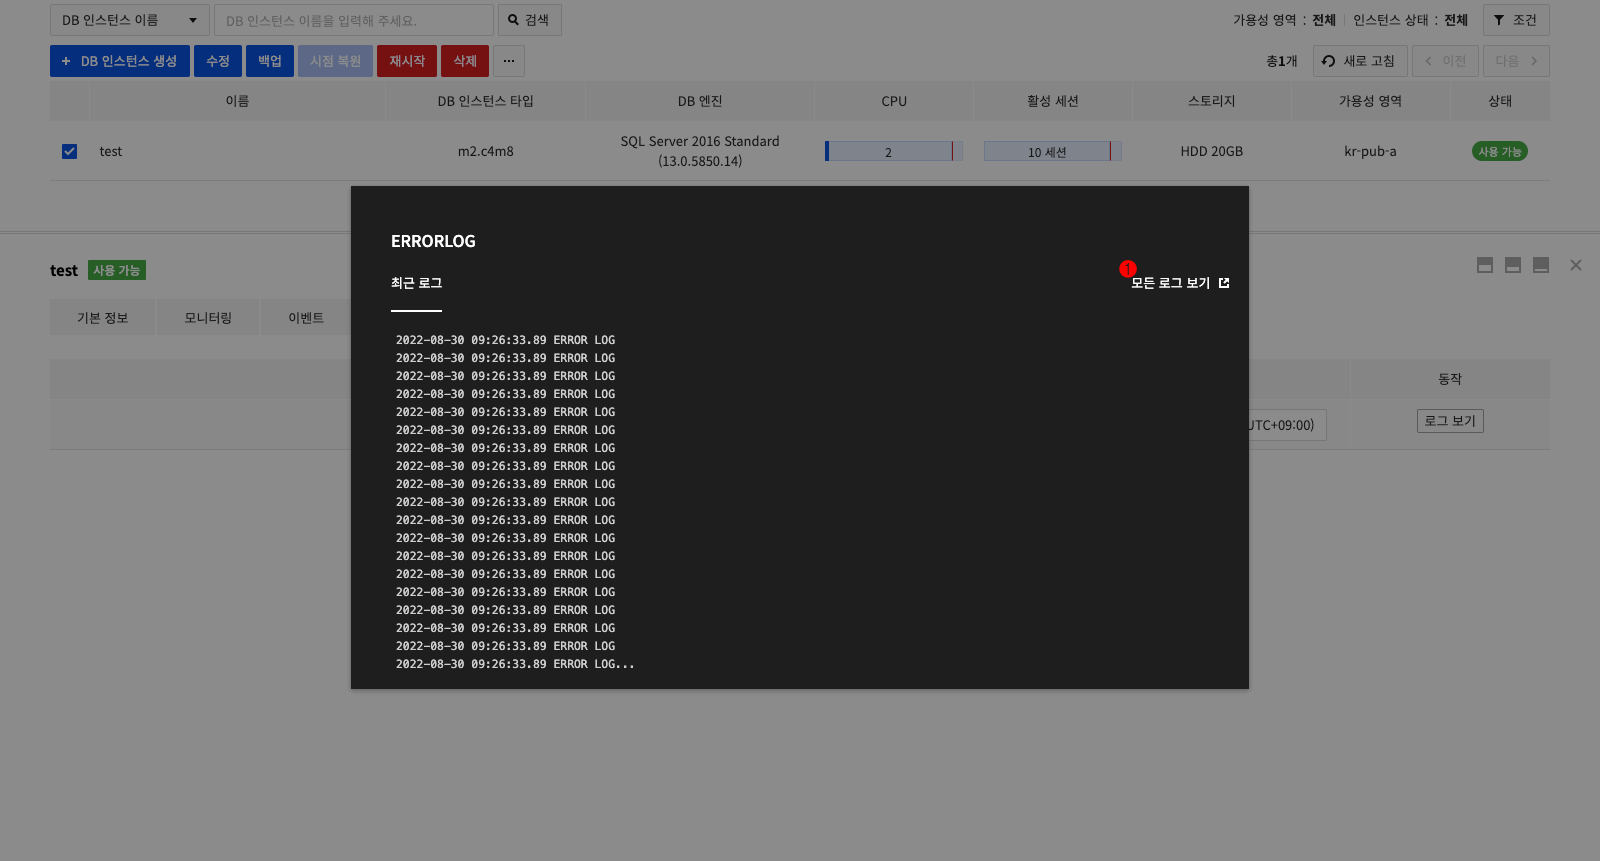
- ❶ Click View All Logs to check all logs for the search period through infinite scrolling.
Backups
Check out the setting related to backup of a selected DB instance and backup file information. One page shows up to 50 backups on the list.

- ❶ You can activate or deactivate backup. If backup is deactivated, auto backup is not proceeded during the backup execution time.
- ❷ You can activate or deactivate log backup. While log backup is deactivated, the point-in-time restoration time does not increase.
- ❸ Show the creation time for the latest executed backup.
- ❹ Show the backup execution time. If time is not specified, the time specified by the system is displayed.
- ❺ Show whether to activate backup.
- ❻ Show whether to activate log backup.
- ❼ Show whether to proceed with log backup.
- ❽ You can search by backup name.
- ❾ Restore a DB instance by using the selected backup.
- ❿ Delete the selected backup. Only manual backup can be deleted.
- ⓫ Create a manual backup file.
- ⓬ When updating the current list or 50 or more backup files exist, you can move between pages.
Scheduled Task
You can check the scheduled tasks for the selected DB instance. A list of up to 50 scheduled tasks appears on a screen.
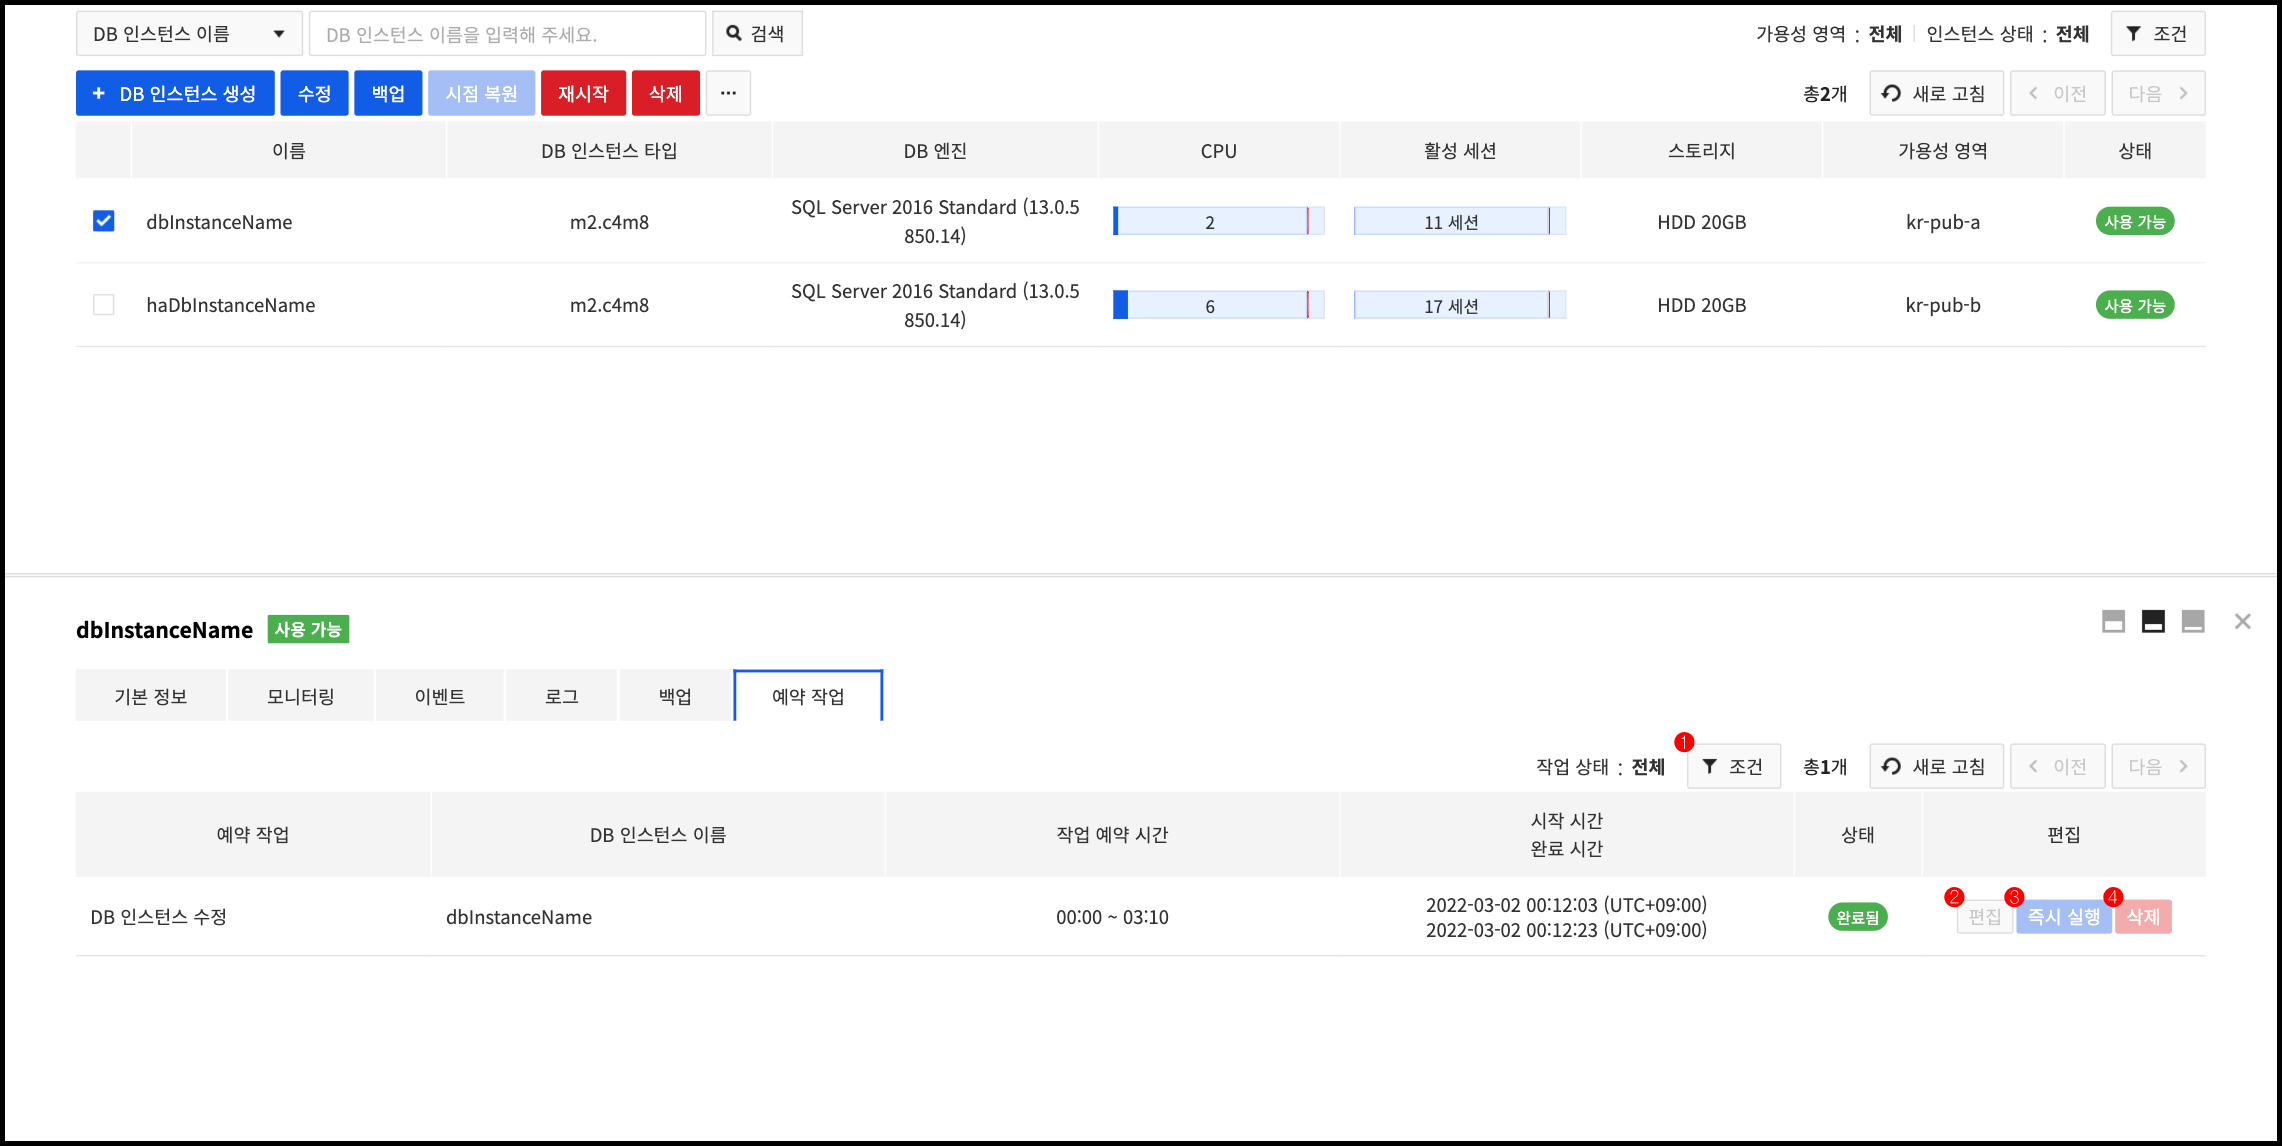
- ❶ If you click the Condition button, you can filter the results by scheduled task status.
- 'All' searches for all status values other than Deleted.
- ❷ Click Edit to change the time set for the scheduled task.
- ❸ Click Run Immediately to change the time for the scheduled task to the current time.
- ❹ Click Delete to delete a scheduled task.
- You can delete scheduled tasks with status 'Scheduled', 'Registered', 'Canceled', 'Error', or 'Verification Failed'.
- If you delete a scheduled task with 'Scheduled' or 'Registered' status, the task will not be executed.
Differential Backup to Object Storage
You can perform a differential backup of DB instances, and export the differential backup files to object storage.
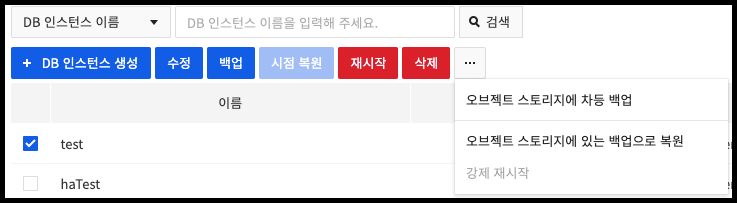
After selecting a specific DB instance from the list, click the Differential Backup to Object Storage button, and the following pop-up shows up:
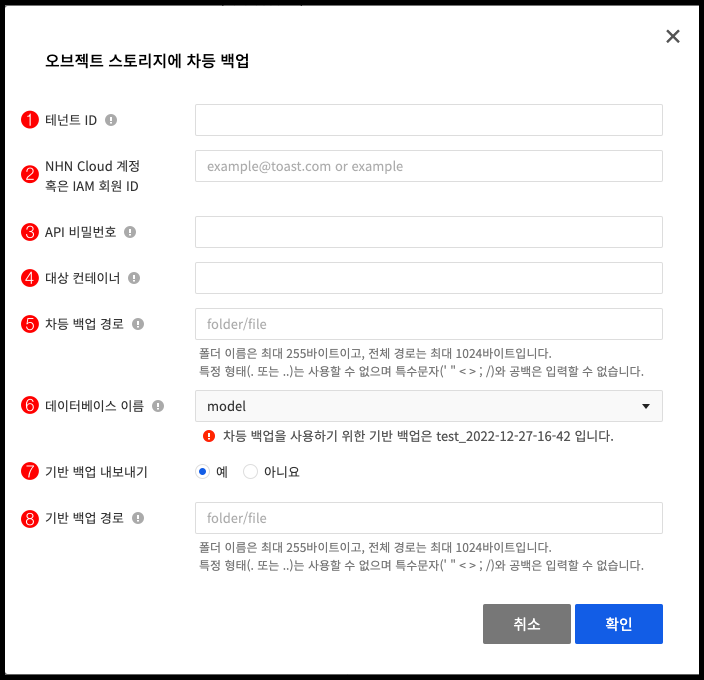
- ❶ Enter the Tenant ID of the object storage where the differential backup file will be stored. This can be checked in the API endpoint settings in the object storage service web console.
- ❷ Enter the NHN Cloud account (e-mail) of the object storage where the differential backup will be stored.
- ❸ Enter the API password of the object storage where the differential backup will be stored.
- ❹ Enter the container name of the object storage where the differential backup will be stored.
- ❺ Enter the file path of the differential backup file to be stored in the container.
- The folder name can be up to 255 bytes, and the full path up to 1024 bytes.
- Specific forms such as . or .. cannot be used and special characters (' " < > ; /) and spaces are not allowed.
- ❻ Enter the name of the database to be backed up.
- ❼ Select whether to use differential backup.
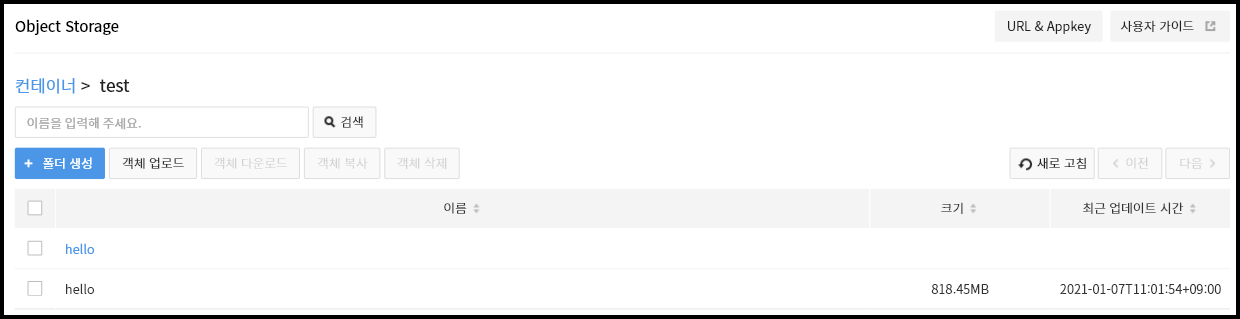
Enter information and press OK to proceed with backup. Once backup completes, the backup file will be available for download from the entered object storage container.
Restore from Backup in Object Storage
A backup file in object storage can be recovered to a DB instance.
After selecting a specific DB instance from the list, click the Restore From Backup In Object Storage button, and the following pop-up shows up:
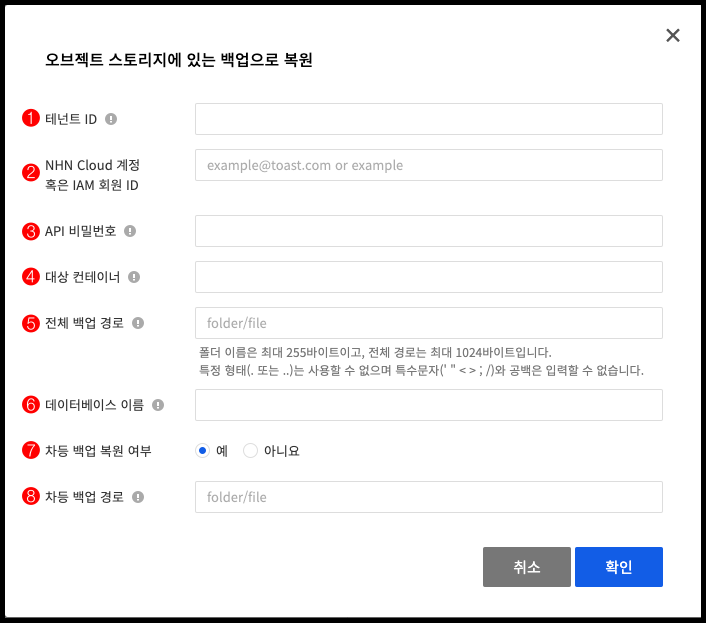
- ❶ Enter the Tenant ID of the object storage where the full backup file is stored. This can be checked in the API endpoint settings in the object storage service web console.
- ❷ Enter the NHN Cloud account (e-mail) of the object storage where the full backup file is stored.
- ❸ Enter the API password of the object storage where the full backup file is stored.
- ❹ Enter the container name of the object storage where the full backup file is stored.
- ❺ Enter the path of the full backup file stored in the container.
- The folder name can be up to 255 bytes, and the full path up to 1024 bytes.
- Specific forms such as . or .. cannot be used and special characters (' " < > ; /) and spaces are not allowed.
- ❻ Enter the name of a database to be restored.
- ❼ Select whether to restore differential backups.
- ❽ Enter the path of the differential backup file stored in the container.
Press OK after entering the information and the backup process begins.
Backups
On Backups, check out information on manual or auto backup files of all DB instances.
List of Backups

- ❶ Search is available by the backup name.
- ❷ Restore DB instances by using selected backups.
- ❸ Delete selected backups: only manual backups can be deleted.
- ❹ Create manual backup files.
- ❺ Pagination is available when the current list is updated or if there are more than 50 backup files.
Create a Backup
Click Create Backup on Backups and a pop-up for creating a backup shows up. Select a DB instance, enter name and click Create to execute backup.
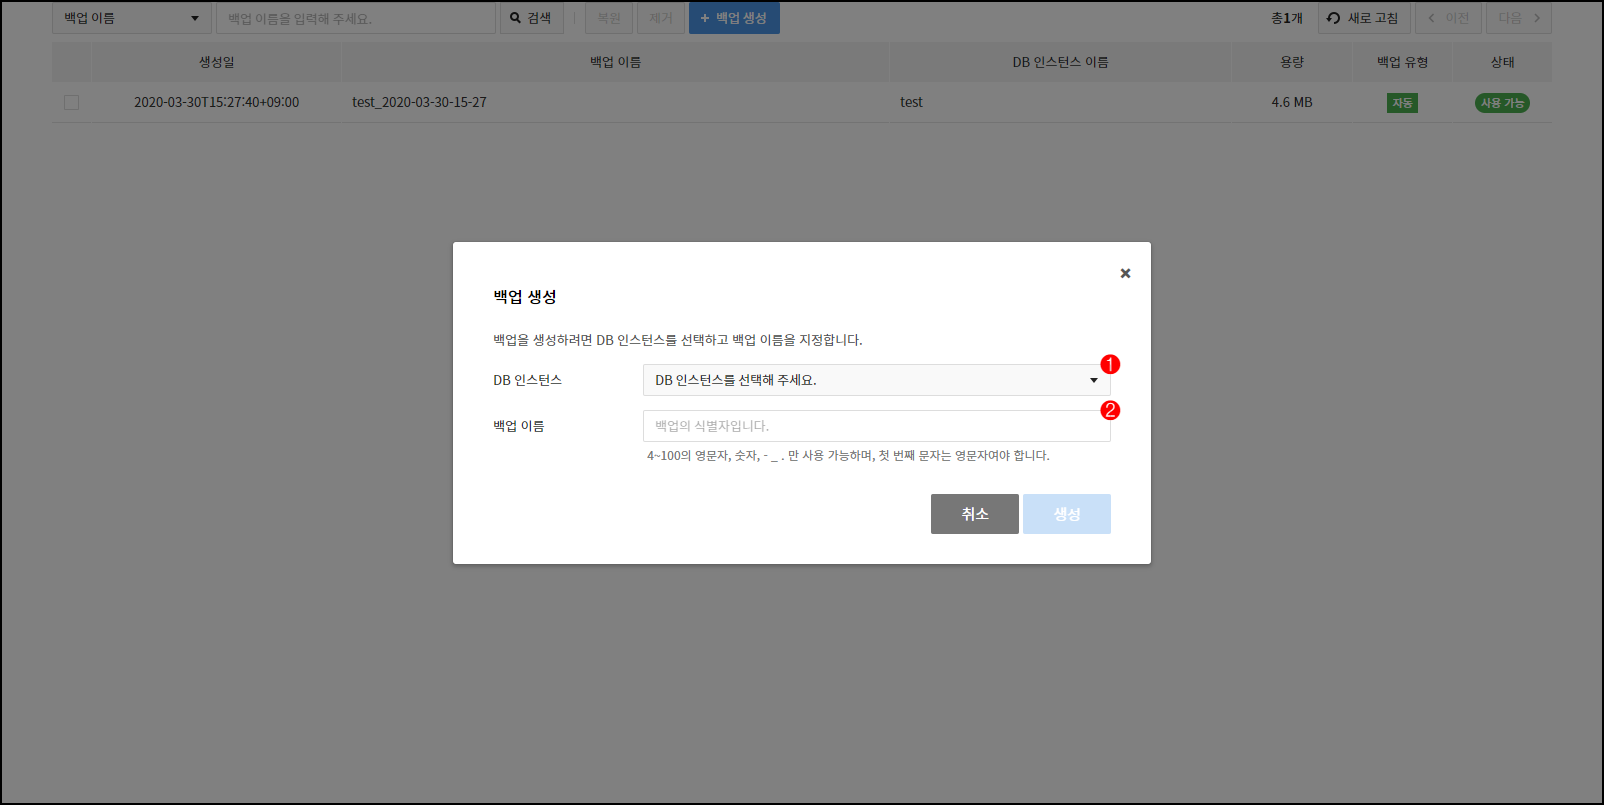
- ❶ Select a DB instance to back up. Only currently available DB instances show.
- ❷ Enter name of a backup.
- For more details, see Backup and Restoration.
Export a Backup to Object Storage
An auto backup file or manual backup file can be exported to object storage.

Select the backup to be sent to object storage from the list and click the Export to Object Storage button.
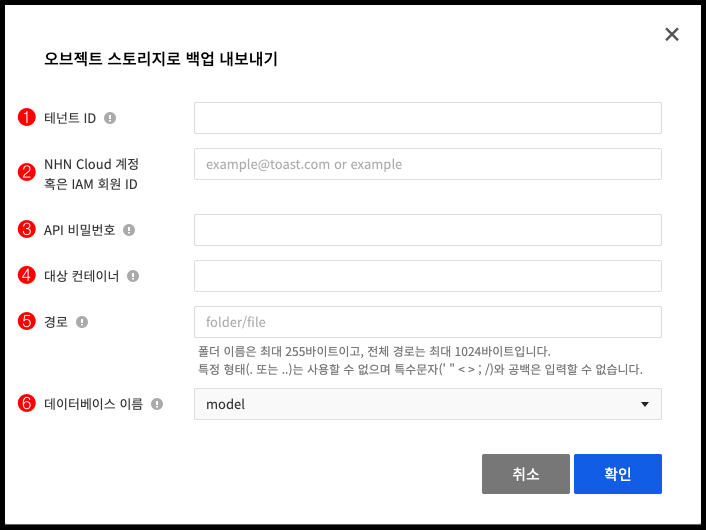
- ❶ Enter the Tenant ID of the object storage where the backup file will be stored. This can be checked in the API endpoint settings in the object storage service web console.
- ❷ Enter the NHN Cloud account (email) or the IAM member ID of the object storage to store the backup file.
- ❸ Enter the API password of the object storage where the backup will be stored.
- ❹ Enter the container name of the object storage where the backup will be stored.
- ❺ Enter the file path of the backup file to be stored in the container.
- The folder name can be up to 255 bytes, and the full path up to 1024 bytes.
- Specific forms such as . or .. cannot be used and special characters (' " < > ; /) and spaces are not allowed.
- ❻ Select a database to which the backup is exported.
Restoration
RDS for MS-SQL supports Restoration with Backup and Point-in-time Restoration. For more details, see Backup and Restoration.
Restore using Backup
You may restore data by using backup, from the Backup tab or the Backup panel of DB instance details view. Select a backup for restoration from the list, click Restore, and it goes to the restoration page.

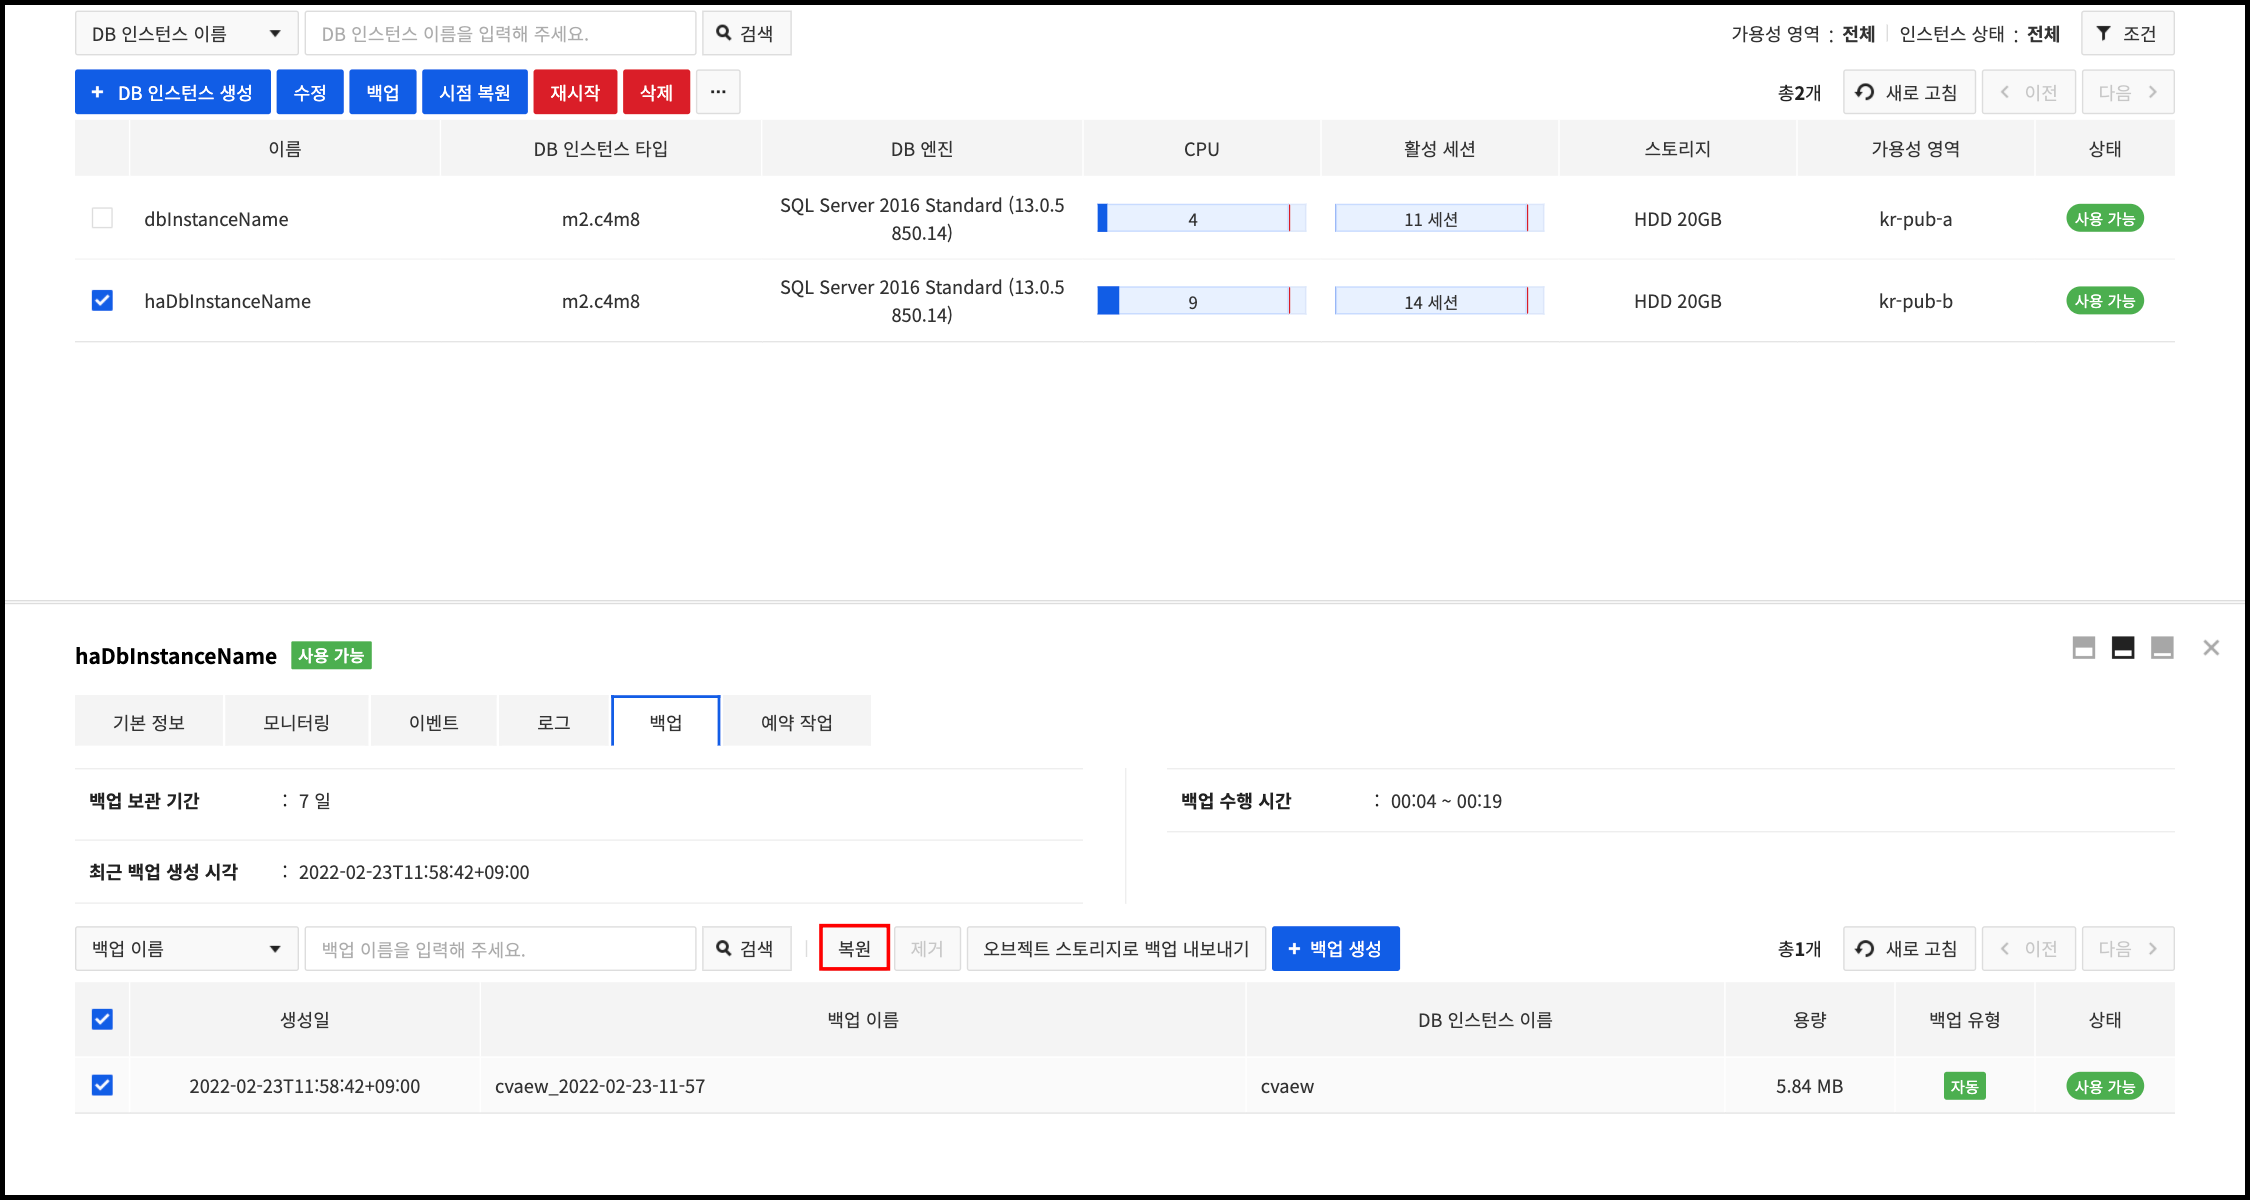
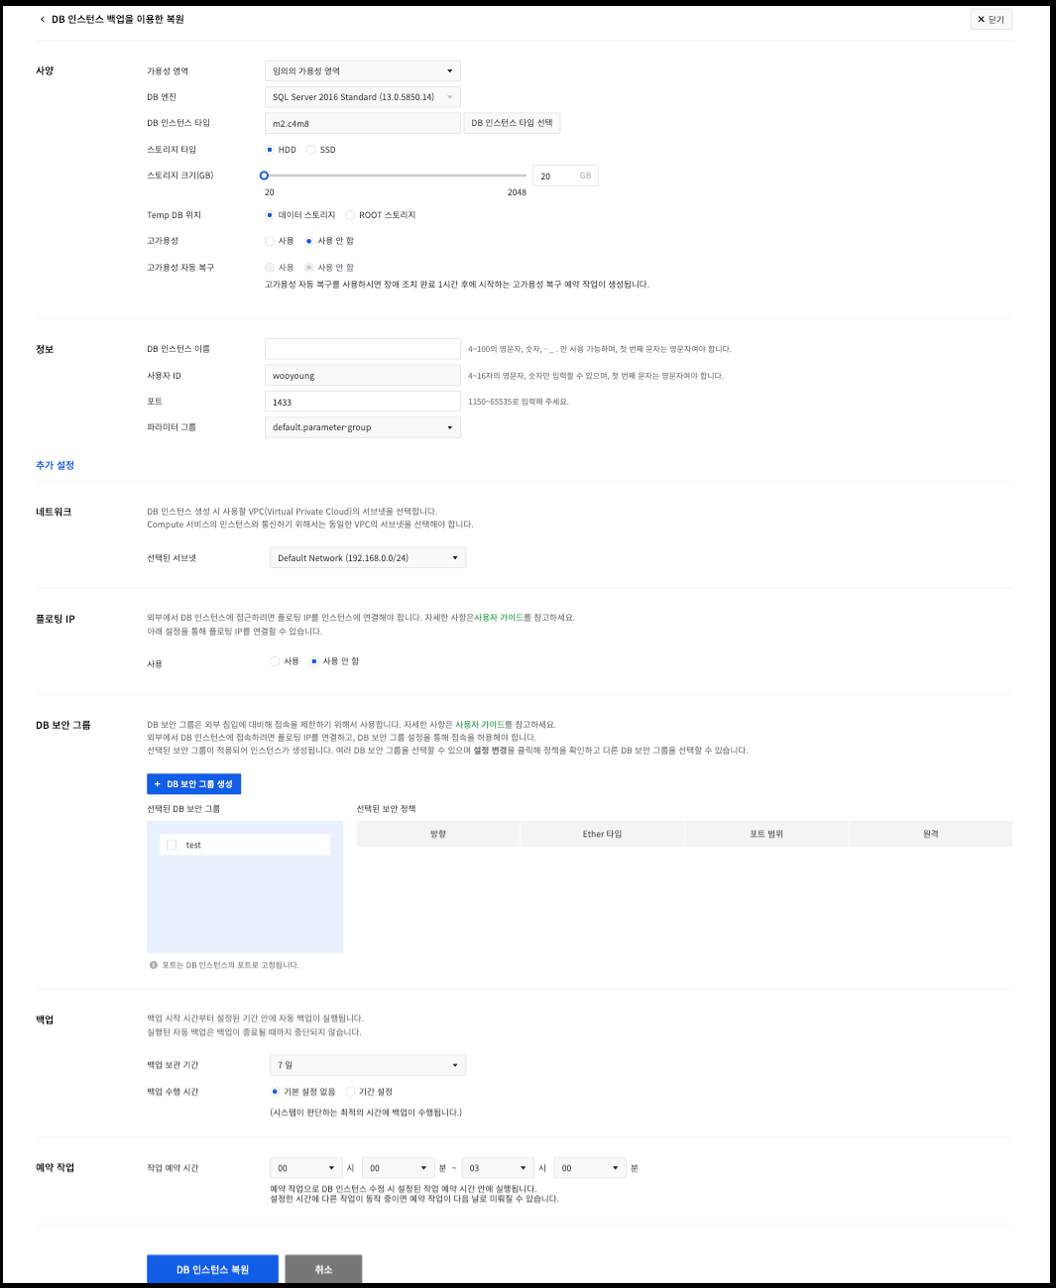
Select type of a newly created DB instance and set up, and press Restore DB Instance at the bottom to restore the DB instance. DB instance type, storage type, storage size, port, parameter group, and DB security group are automatically selected.
[Caution] If the parameter group at the time of backup does not exist, default group is selected. Only DB security group that exists during backup is automatically selected.
It takes a few minutes, or up to a few dozens of minutes, to restore a DB instance.
Point-in-time Restoration
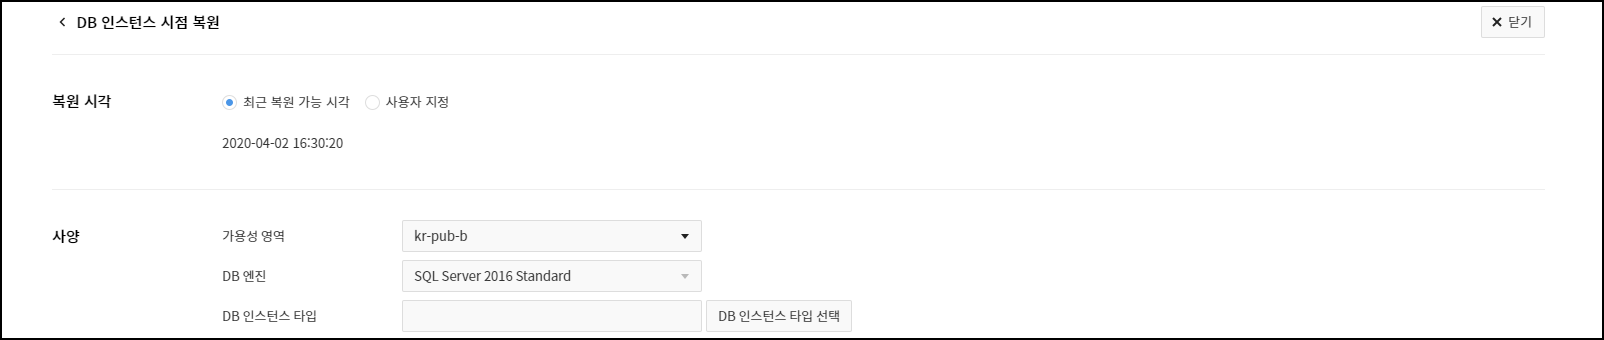
When the backup retention cycle is more than a day, DB instances can be restored to a point in time during such retention period. Select a DB instance to restore, click Point-in-time Restoration and it goes to the restoration page.

Provided on the same page for Restoration with Backup, you can select a time to restore on top of the page.
To restore to a different point in time other than recent available time, select User Specified.
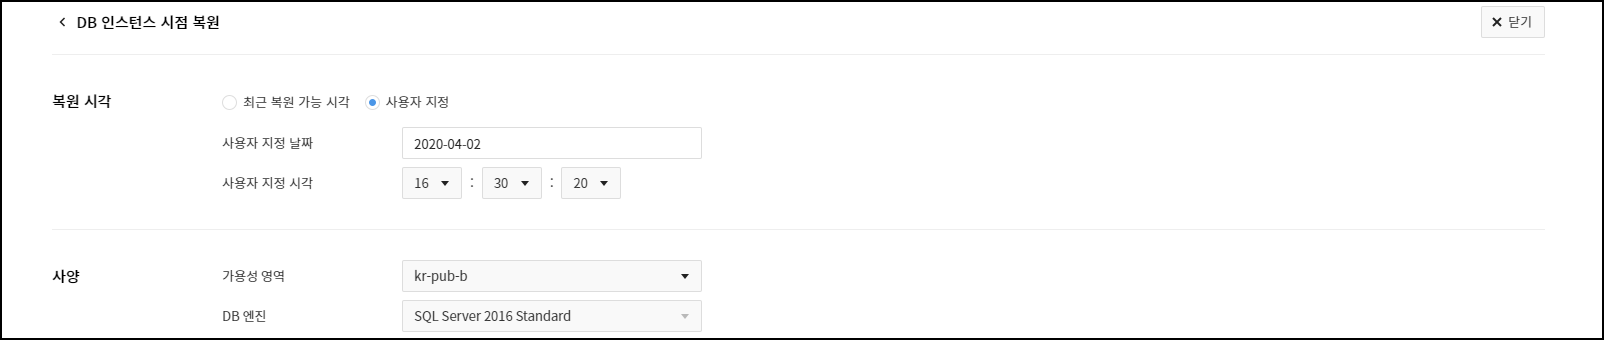
Select type of a newly created DB instance and set up, and press Restore DB Instance at the bottom to restore the DB instance. It takes a few minutes, or up to a few dozens of minutes to restore a DB instance.
Events
On the Events tab, check out recent events or set up for event subscription. For more details on events and subscription, see Monitoring.
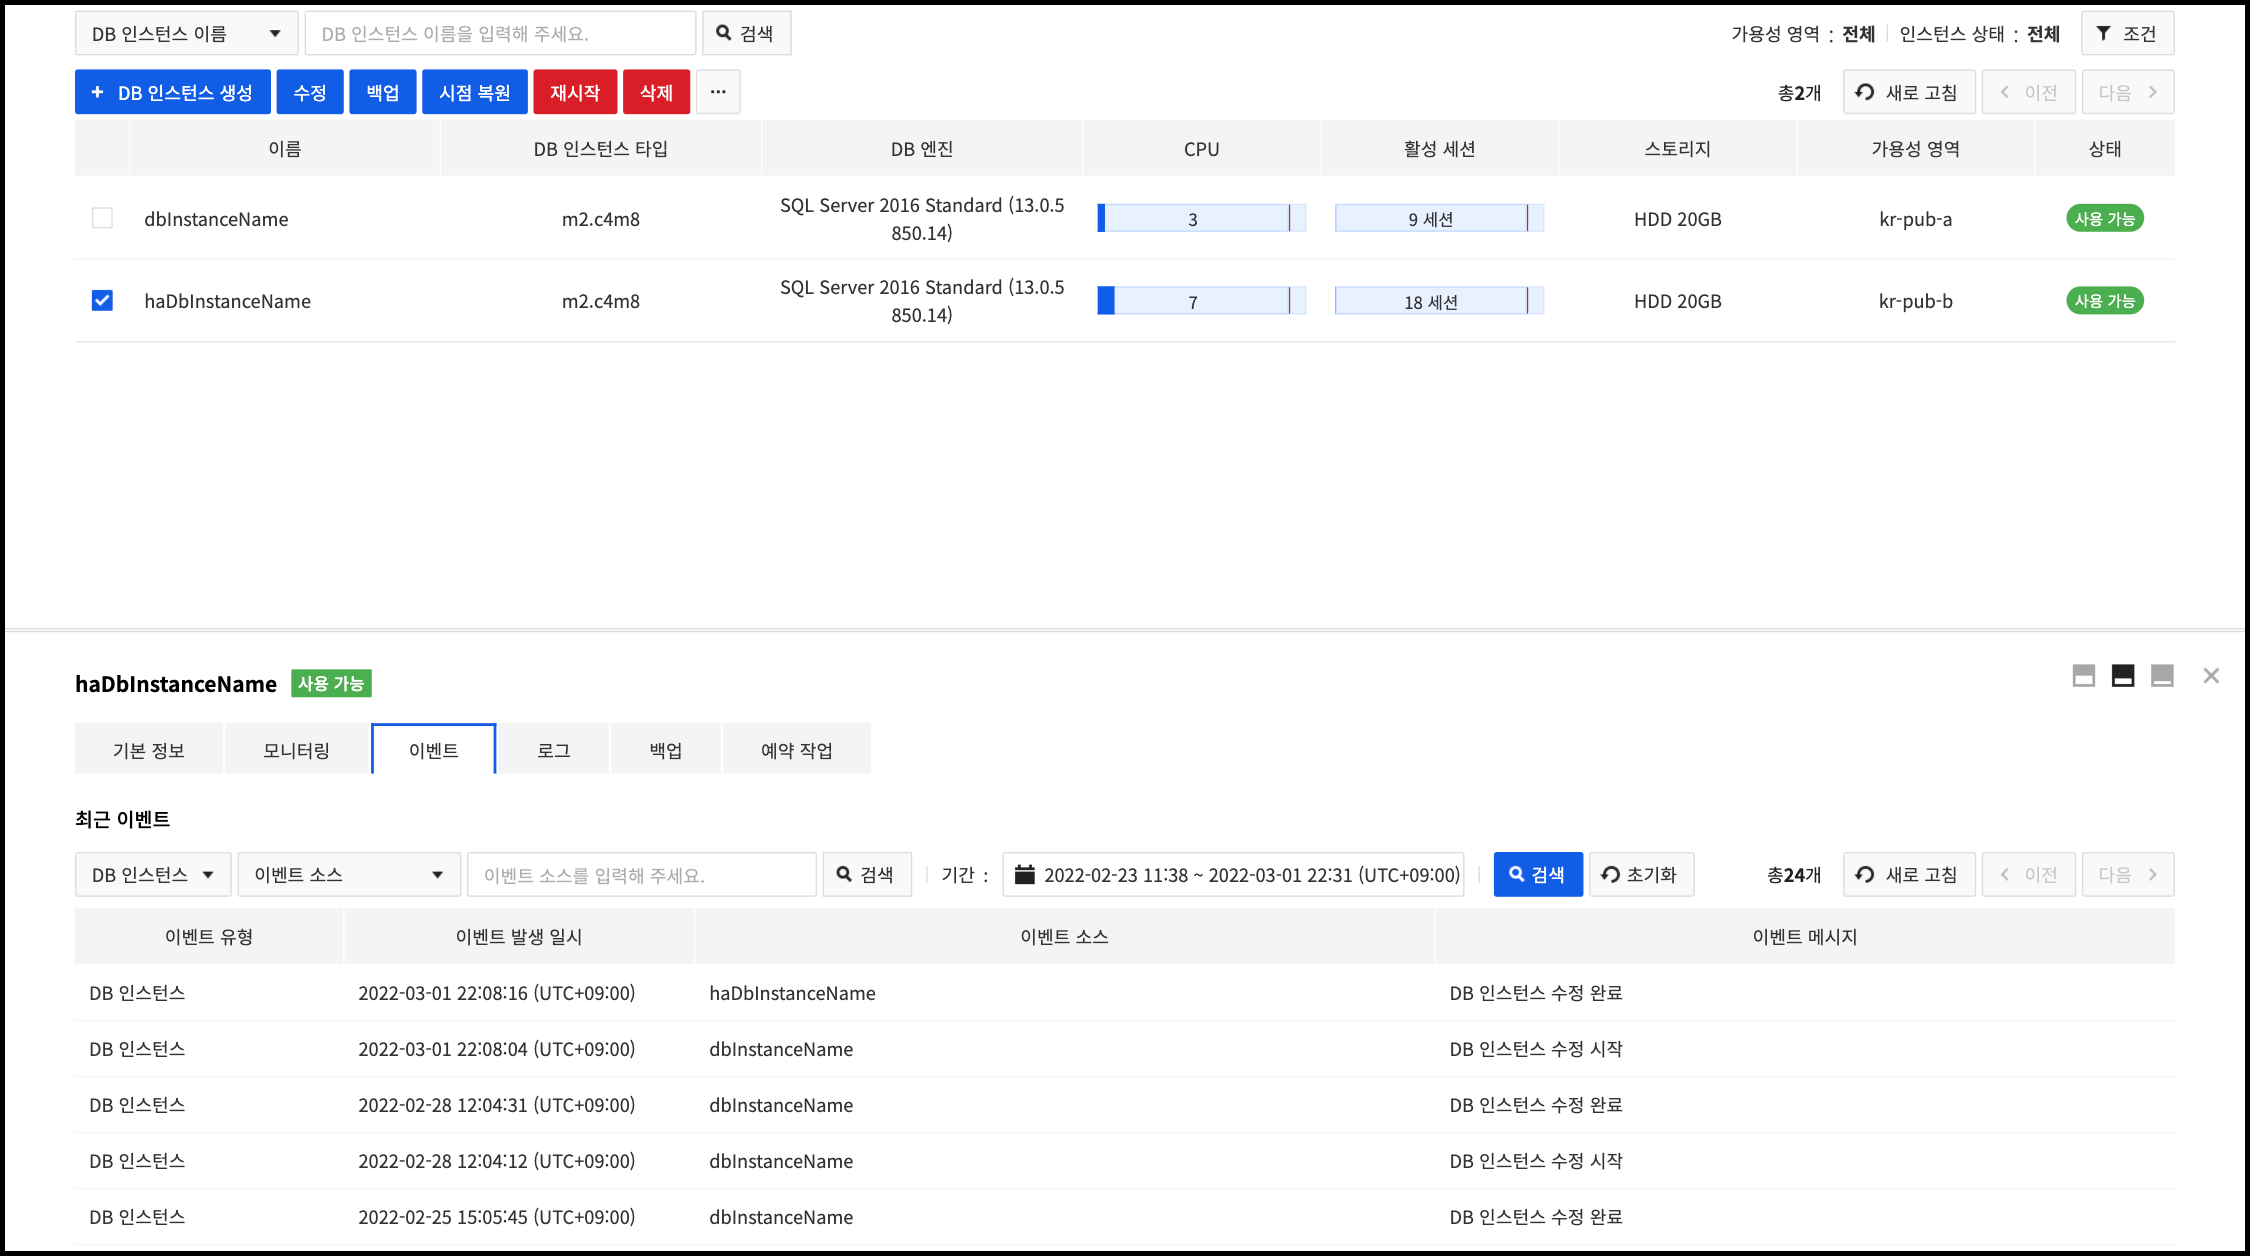
List of Recent Events
Check out events of recent occurrence. The 50 events that are exposed at one shot can be filtered out with many conditions.
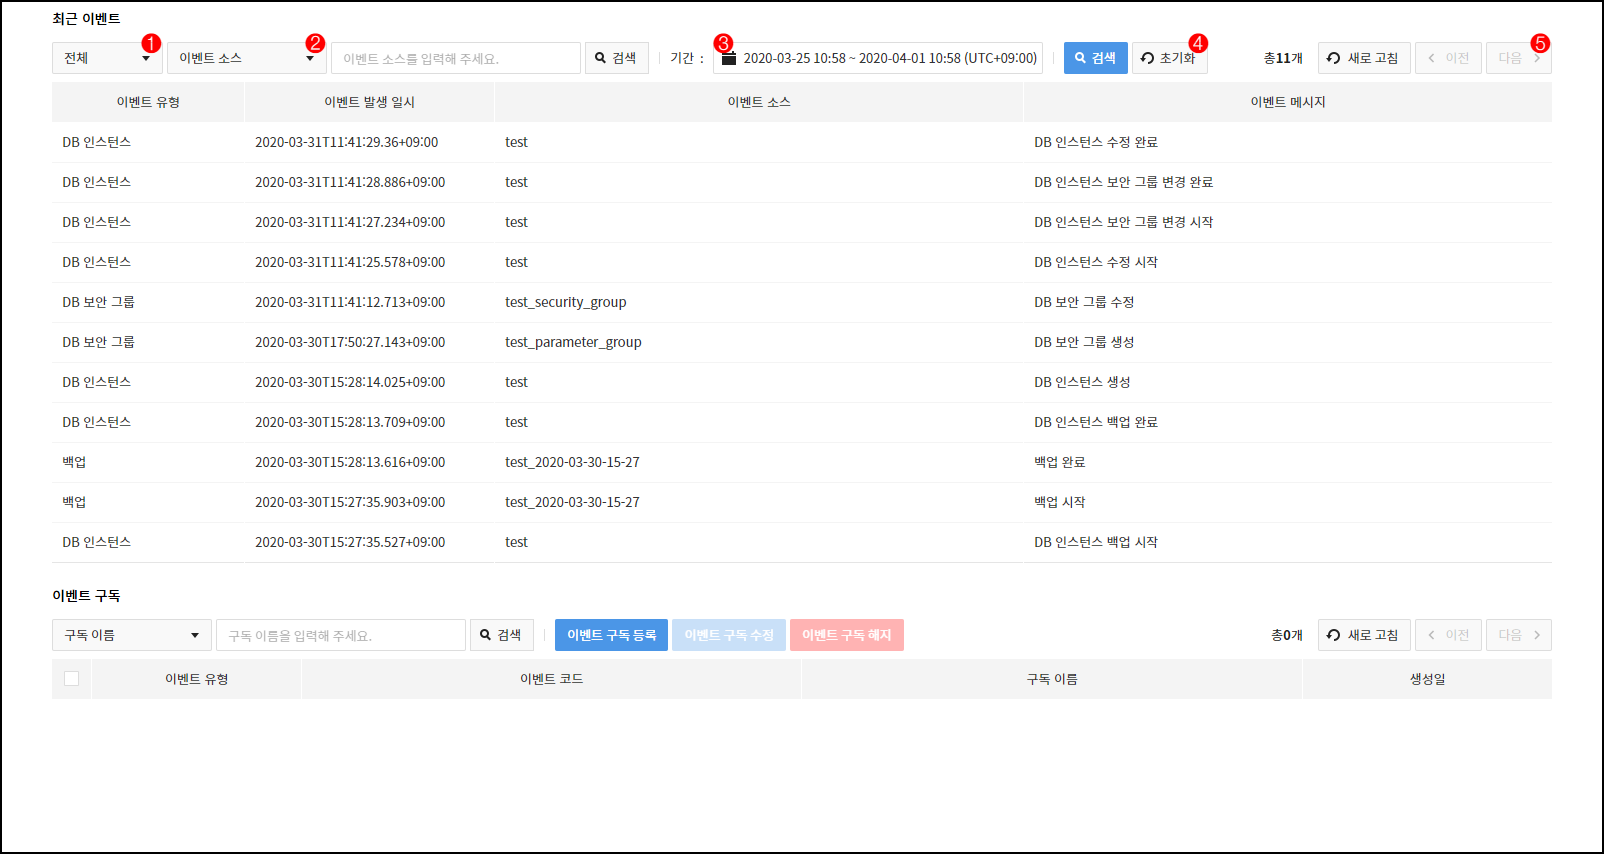
- ❶ Select an event type to show.
- ❷ Select a target to be searched with search words. Search is available with an event source or a message.
- ❸ Select time of event occurrence.
- ❹ With Initialize, all search conditions are set as default.
- ❺ Pagination is available when the current list is updated or if there are more than 50 events.
Subscribe to Events
Click Register Event Subscription on top of the list of event subscription, and a pop-up to subscribe to an events shows up. Enter information of an event to subscribe, click Create at the bottom and you're subscribed to the event.
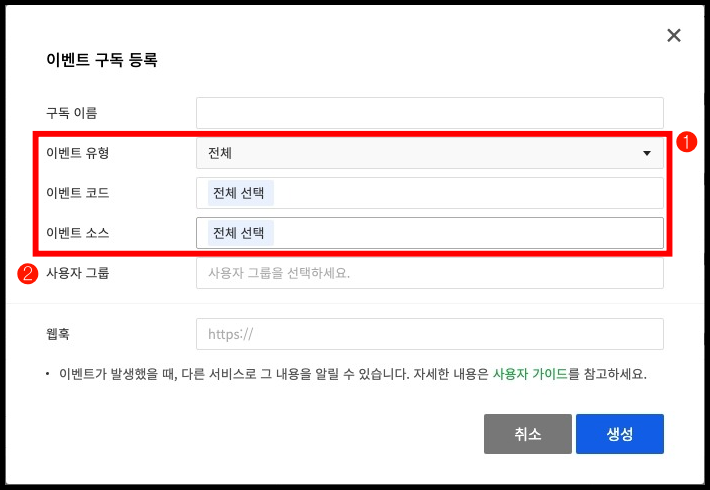
- ❶ Each event type can be subdivided into event codes and event sources.
- ❷ Select the user groups to be notified when the event occurs.
- Supports Autocomplete input.
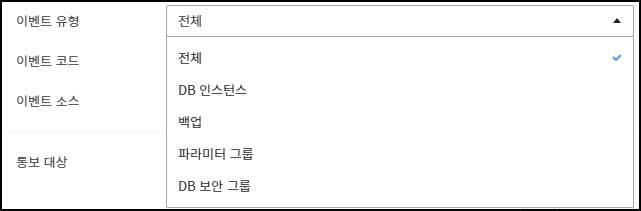
- Select an event type and then choose an event code under.
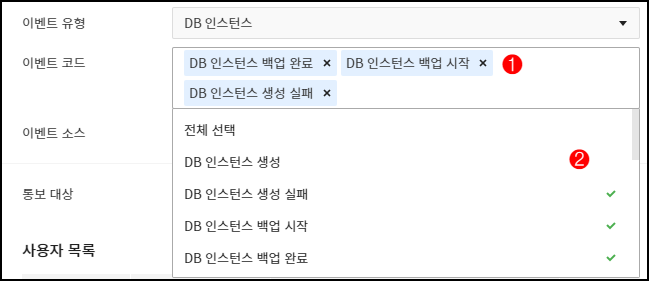
- ❶ Supports autocomplete.
- Available event codes are filtered for a keyword.
- Move up and down on your keyboard to select an event code, press Enter, and it is automatically completed.
- You may delete an event code, which has already been added, by pressing the backspace or clicking x.
- ❷ You may select an event code with a click of the mouse.

- Shows event sources for each event type.
- ❶ Supports autocomplete.
- Available event sources are filtered for a keyword.
- Move up and down on your keyboard to select an event source, press Enter, and it is automatically completed.
- You may delete an event source, which has already been added, by pressing the backspace or clicking x.
- ❷ You may select an event source with a click of the mouse.
Parameter Groups
On Parameters, create a parameter group to be applied to a DB instance, or modify parameters of a parameter group.
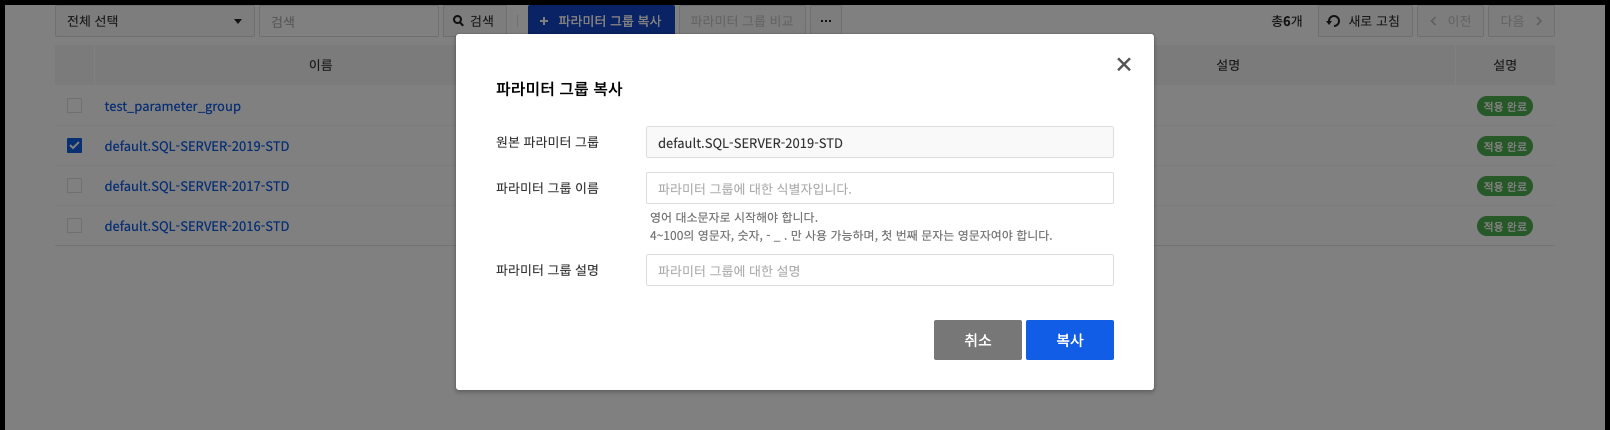
Create a Parameter Group
To create a parameter group, default value must be copied from an existing parameter group. Select a target from the list of parameter groups, and click Copy Parameter Groups.

Enter name and description of a parameter group to newly create, and click Copy to create a parameter group.
Modify a Parameter Group
Click name of a target to modify from the list of parameter groups, and it goes to the parameter details.

Click Edit Parameters on top of the parameter details to enter into the edit mode.

Modify the parameter, click Save Changes to modify parameters of the parameter group.
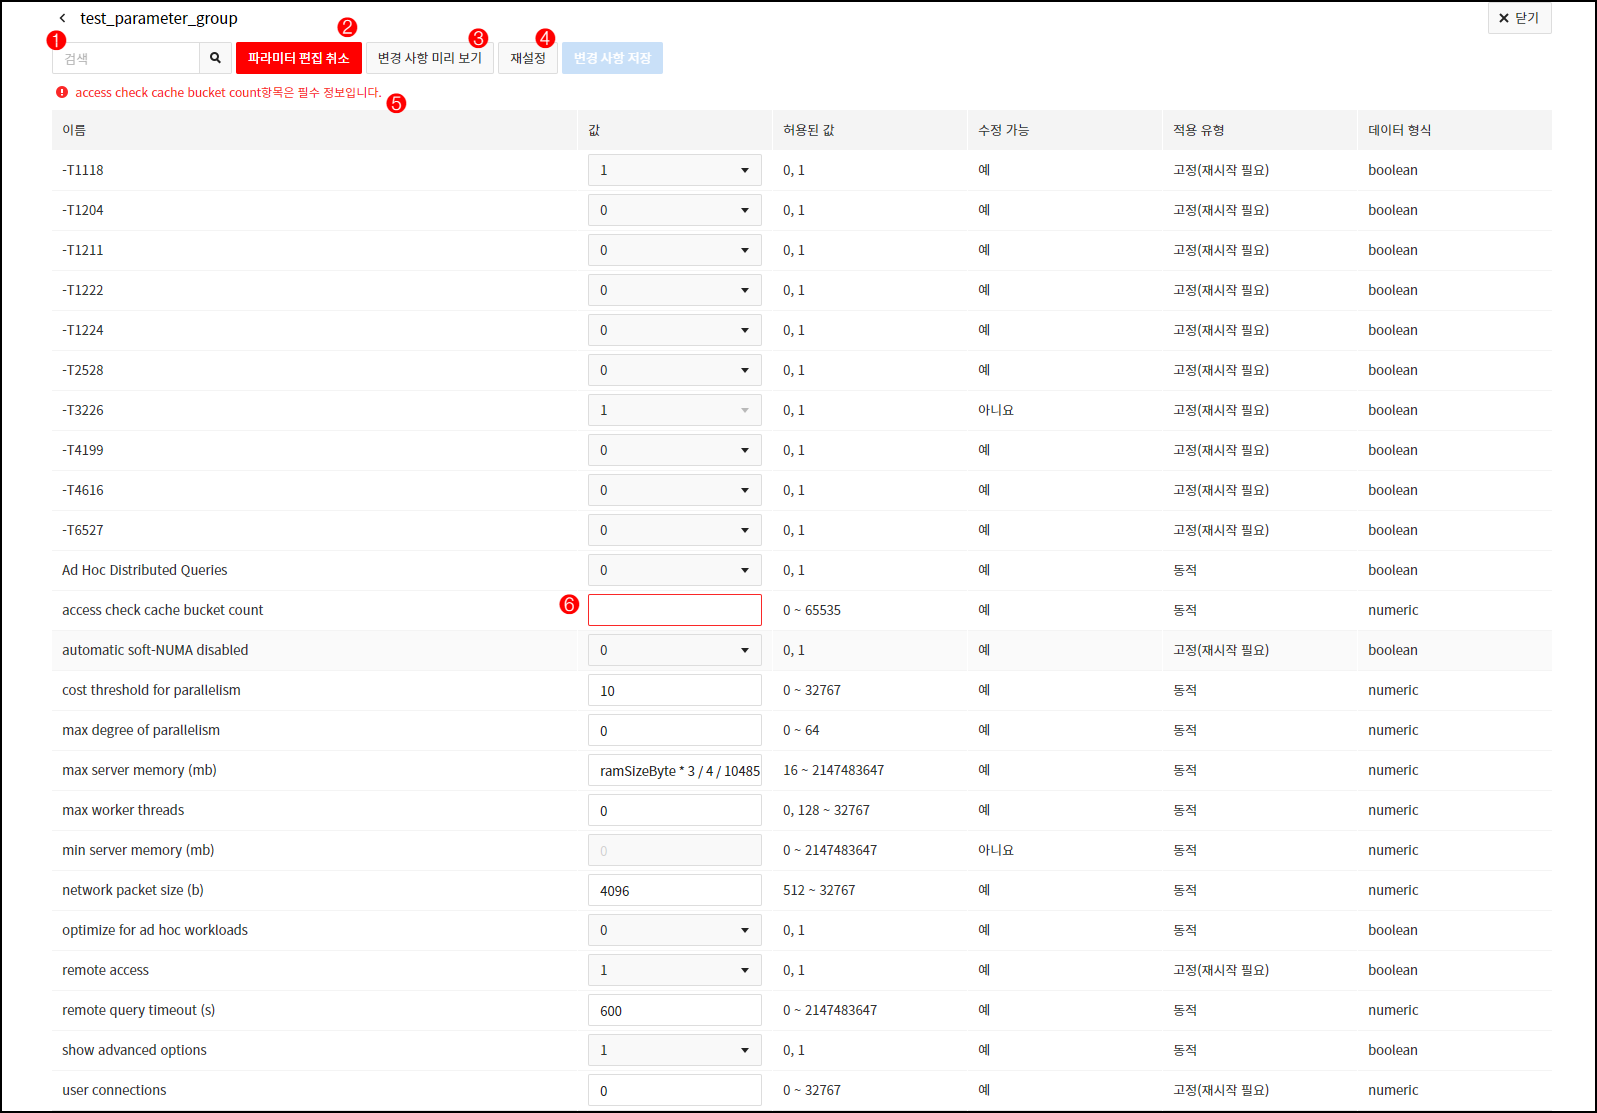
- ❶ You may enter keyword to filter parameters that are exposed.
- ❷ All parameter changes are cancelled and it goes to the detail page.
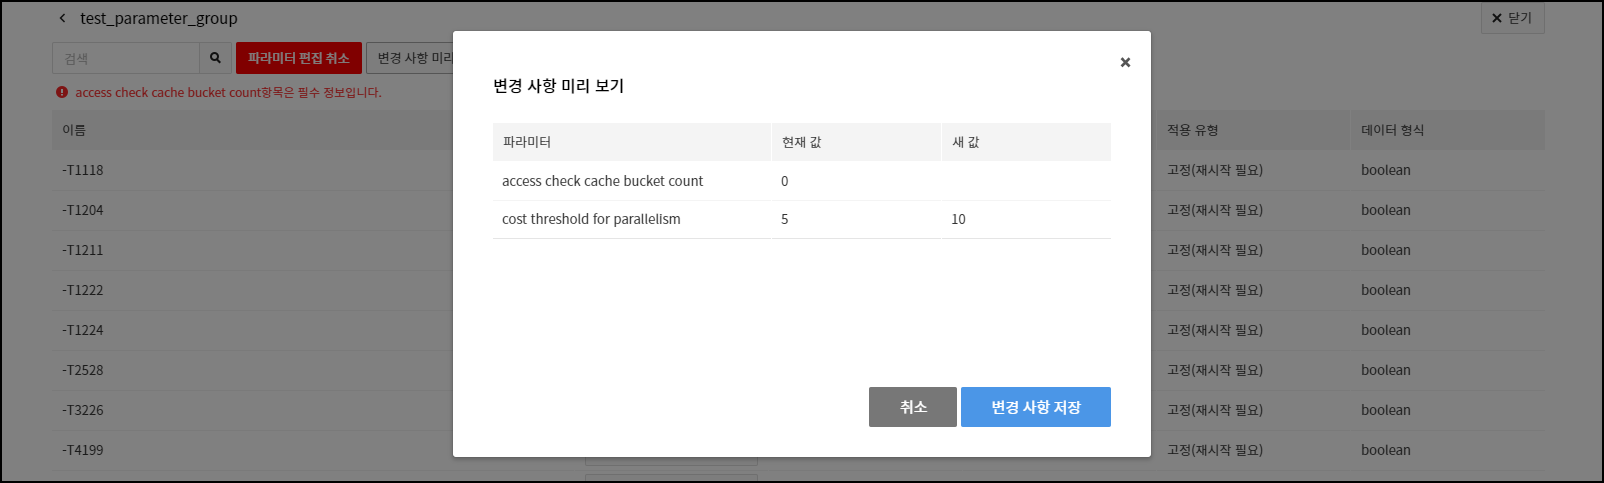
- ❸ A pop-up that compares the status before and after changes shows up.
- ❹ All parameters are returned to default.
- ❺❻ Error messages that occur during parameter modification show.
Compare Parameter Groups
Compare two different parameter groups to find different parameters. Select two parameter groups to compare from the list.

Click Compare Parameter Groups on top to check different parameters.

DB Security Groups
From the DB Security Groups tab, a DB security group can be created or deleted. It is also possible to add, modify, or delete policy for each group. For more details on DB security groups, see Database Access.
Create a DB Security Group
On top of the list of DB security groups, click Create DB Security Group, and a pop-up to create a DB security group shows up.

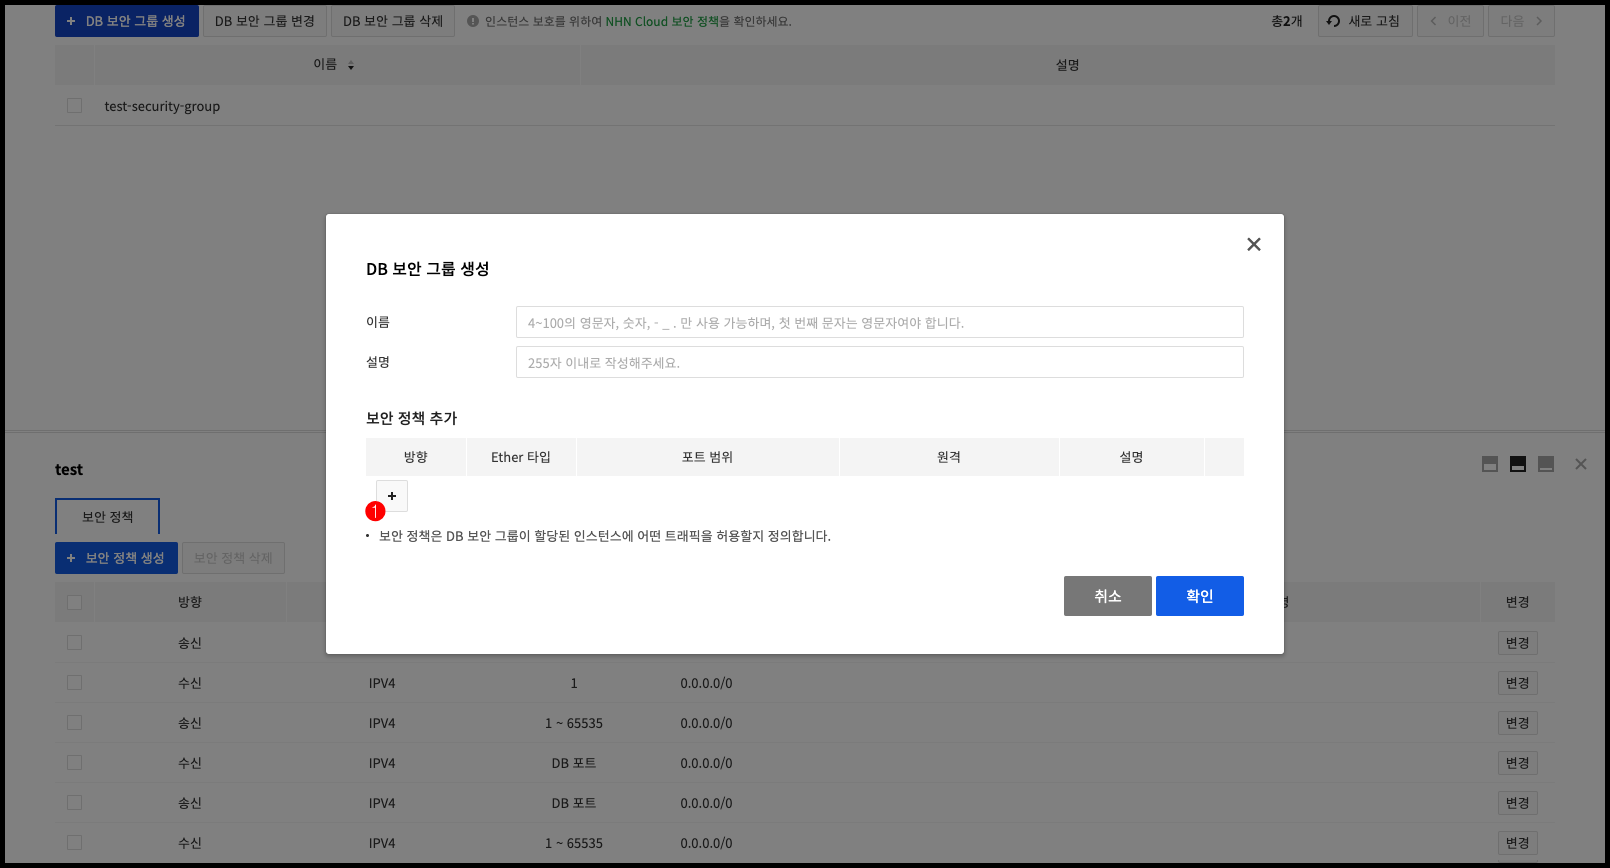
- ❶ Click + to add security policy.
Click OK at the bottom of the pop-up to create a DB security group.
Modify a DB Security Group
Select a DB security group from the list, and click Change DB Security Group on top.
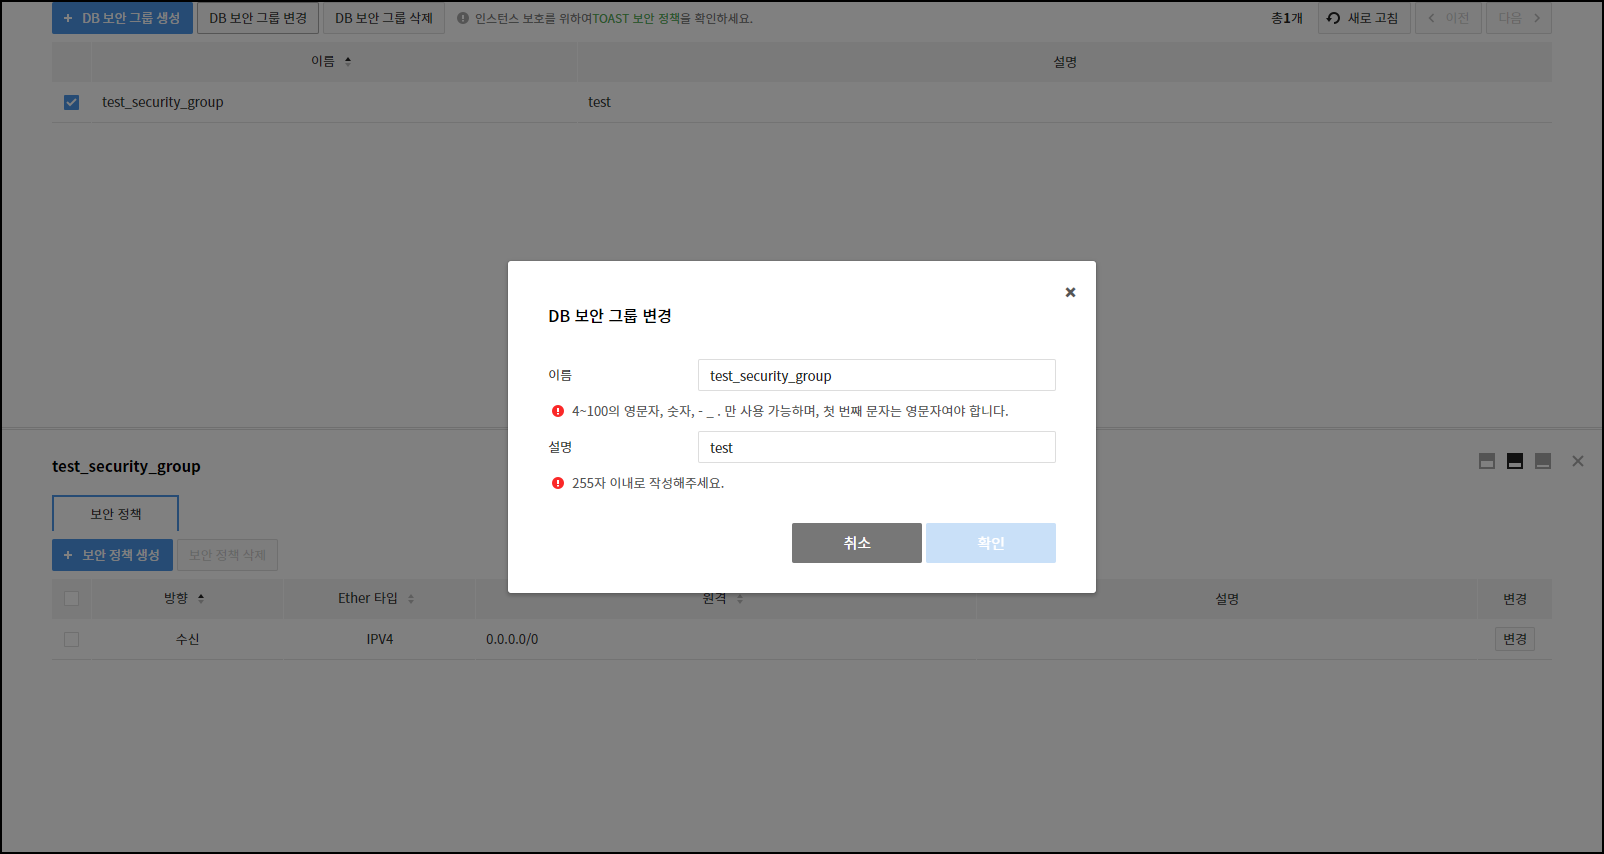
You may modify name and description of a DB security group, although security policy can be modified from a separate setting.
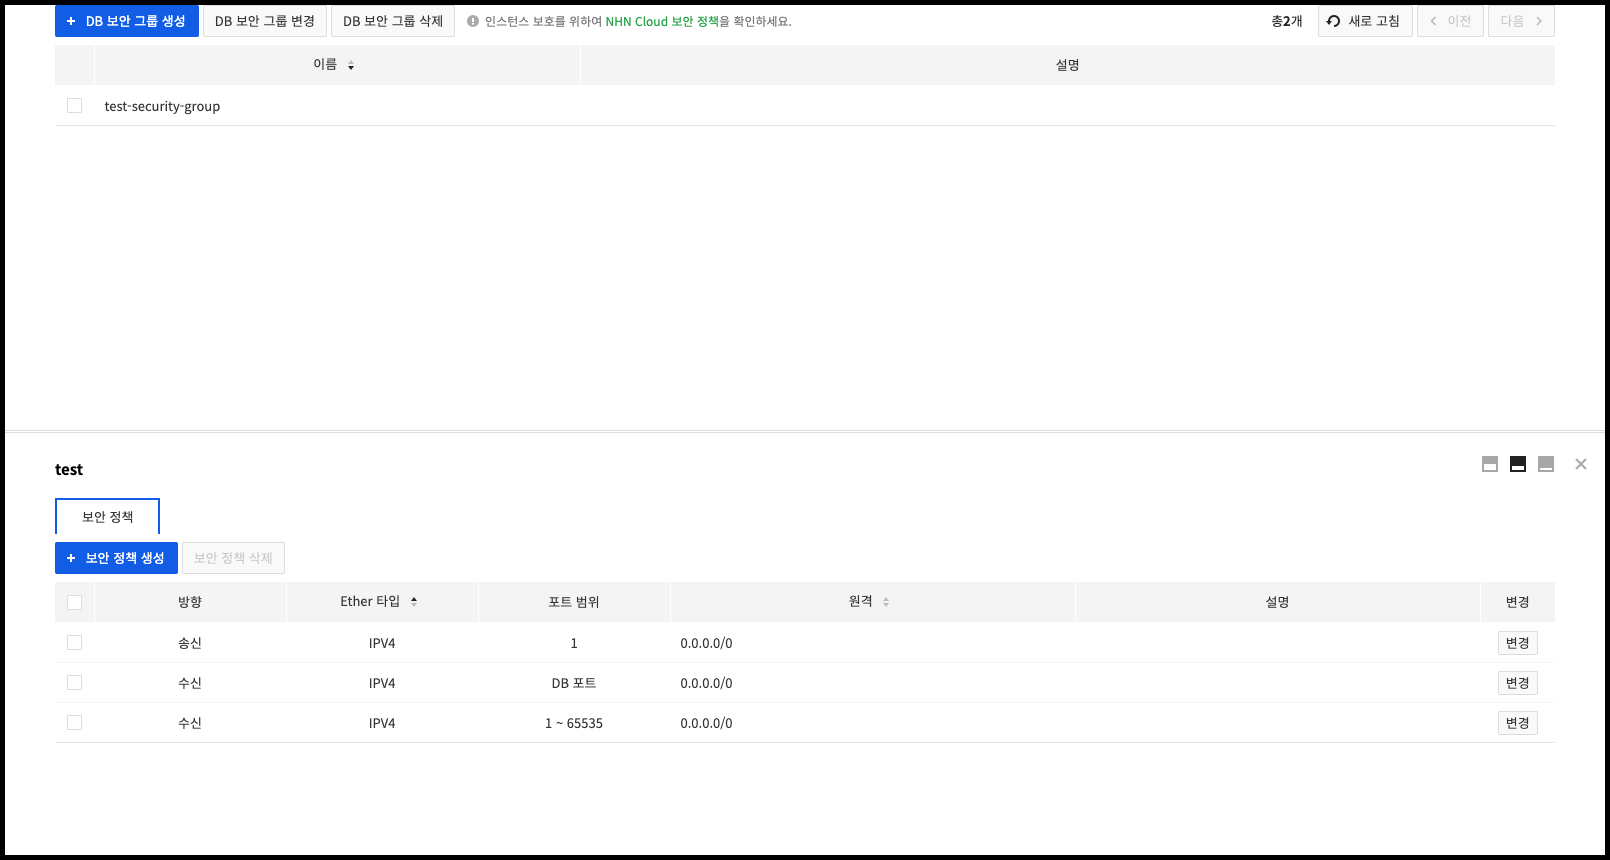
Modify Security Policies
Select a DB security group from the list, and details view panel show up at the bottom of the page where you can check and modify security policies.
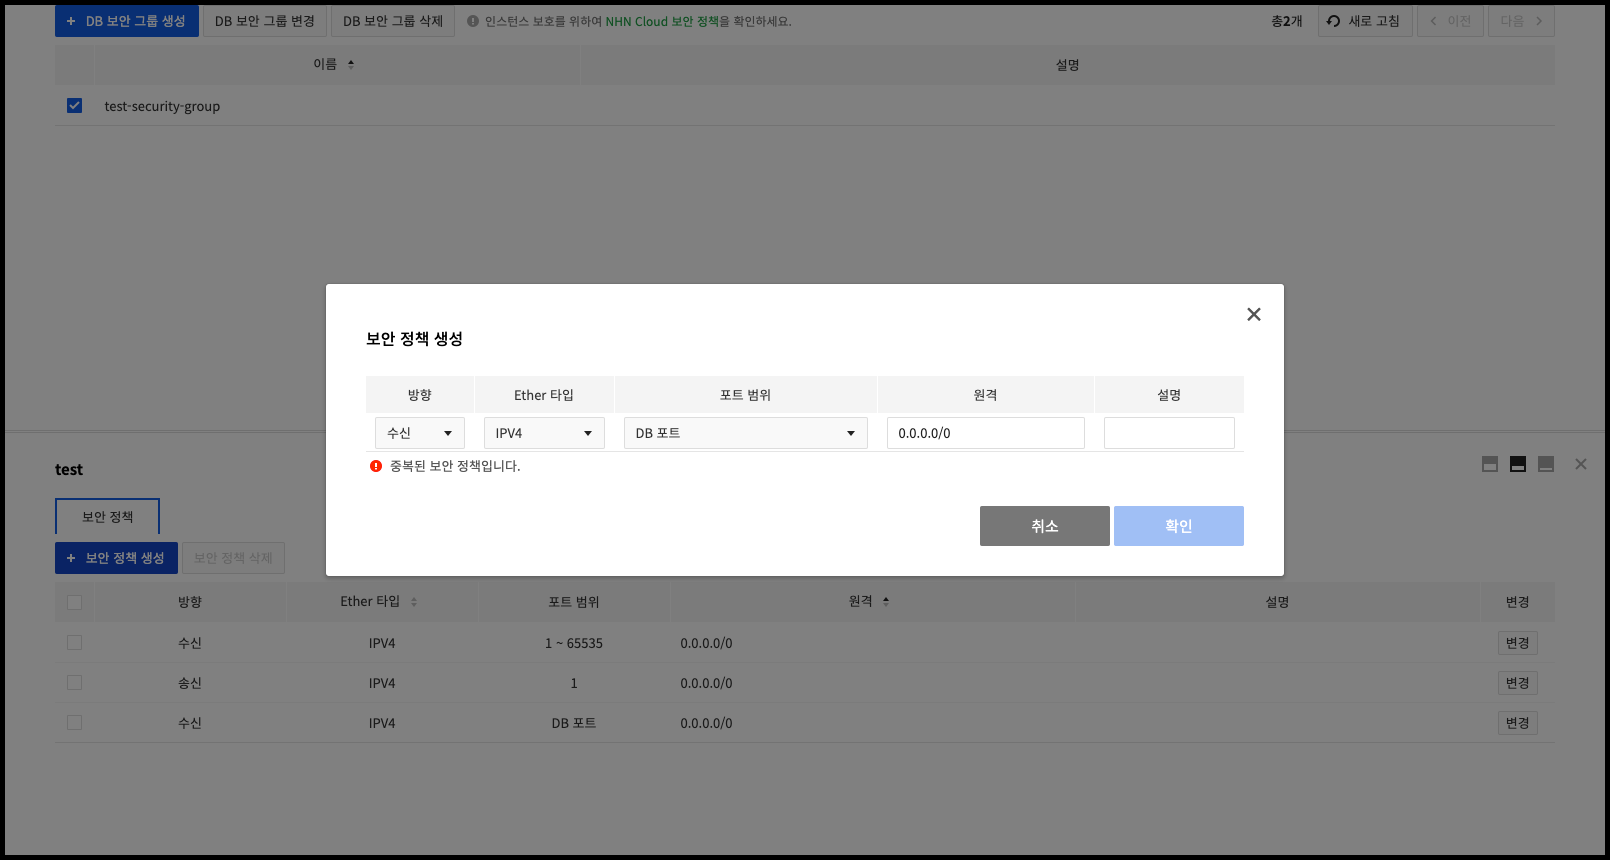
Click Create Security Policy from the panel, and a pop-up to create a security policy shows up.
Select a DB security group policy from the details view panel to change or delete policy.
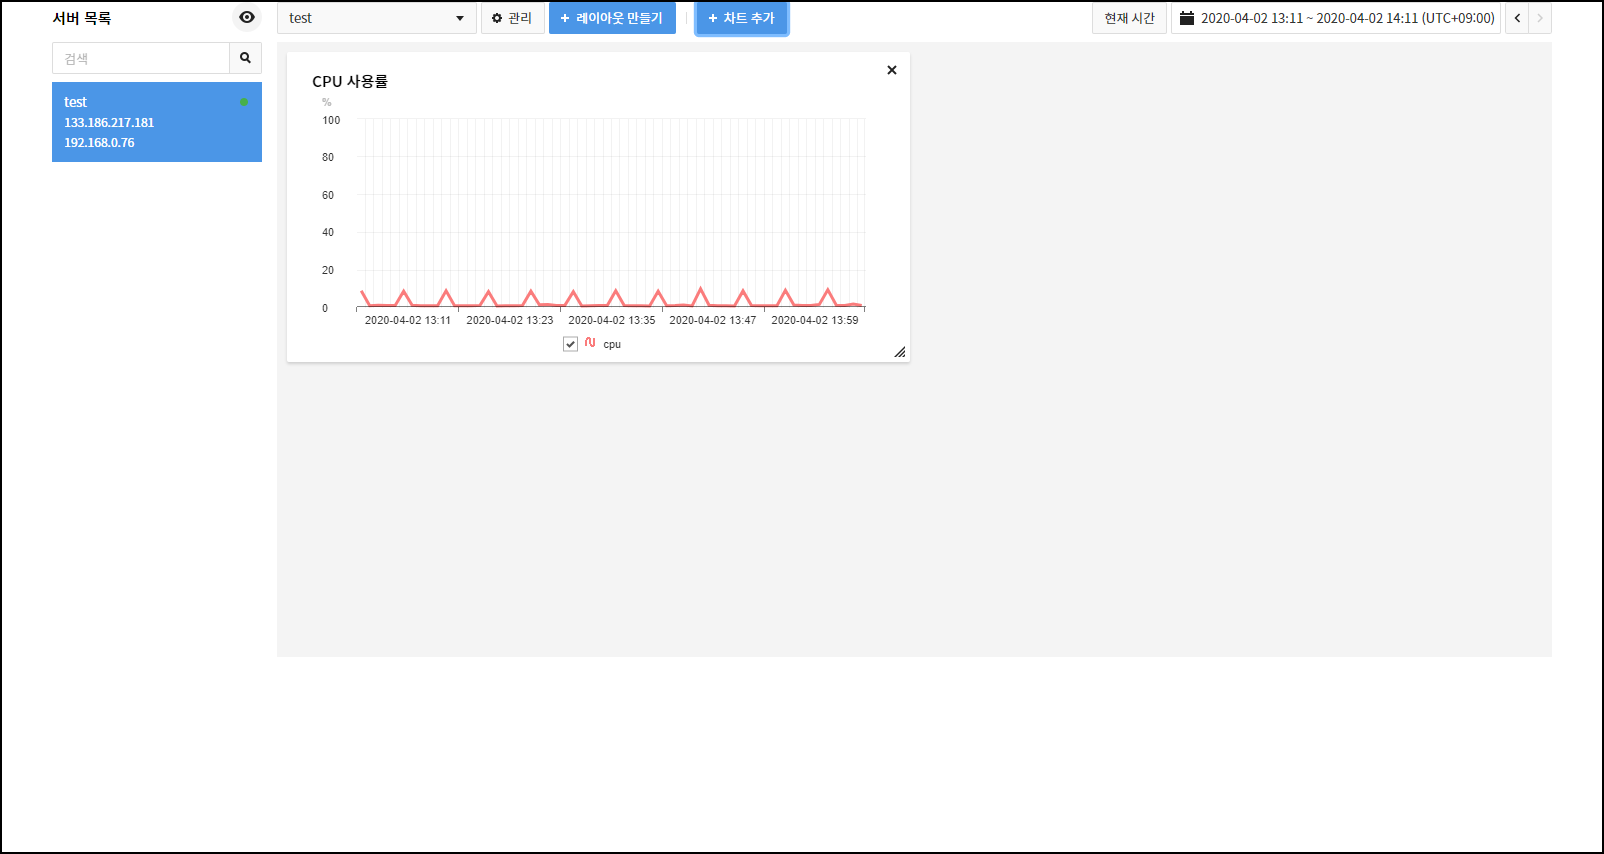
Server Dashboard
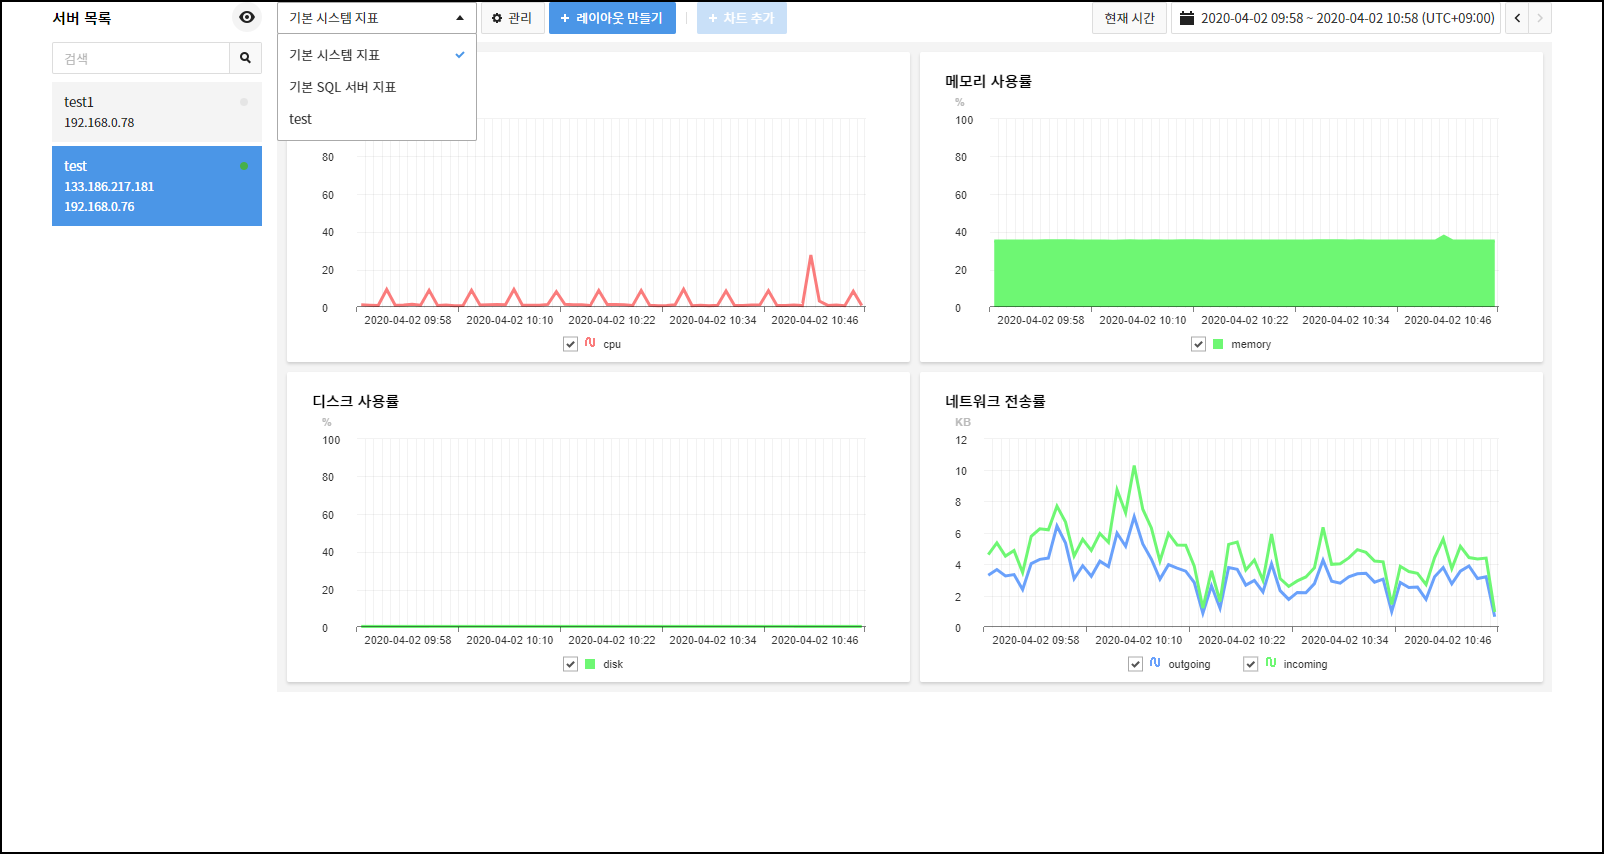
On the Server Dashboard tab, check out performance metrics of a DB instance on a chart. RDS for MS-SQL, by default, provides two layouts, such as basic system metrics and basic SQL server metrics. Default layout cannot be deleted or changed.
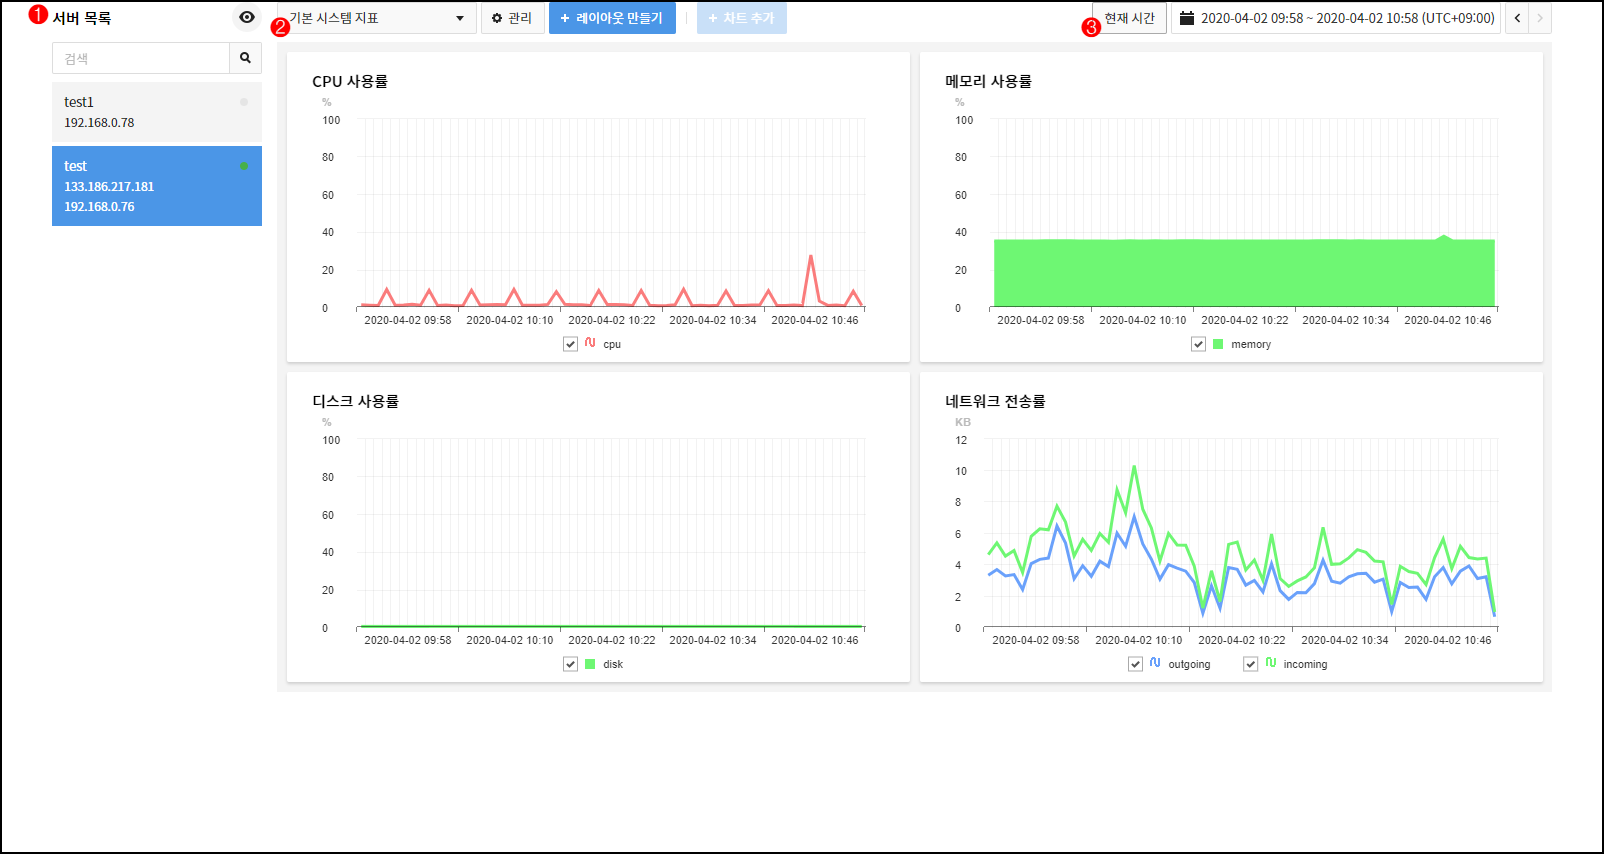
- ❶ Shows created DB instances on the list. By selecting a DB instance, relevant charts become available.
- ❷ With layout changes, find out new metrics.
- ❸ Set the chart query period based on the current time.
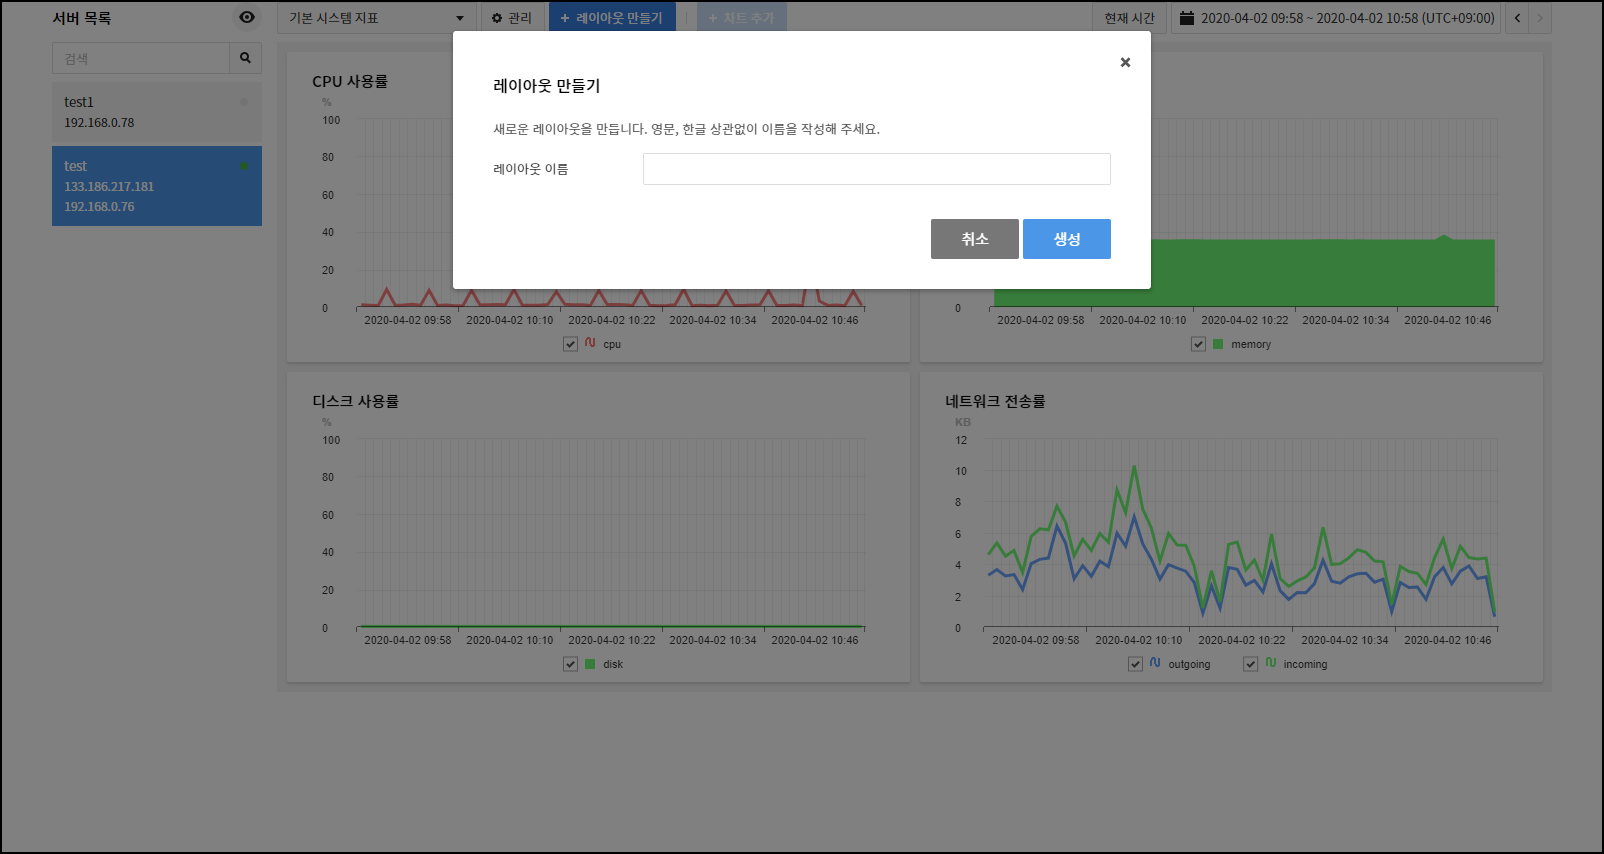
How to Use User Layouts
Click Create Layout to create a layout.
You may add charts onto a new layout.
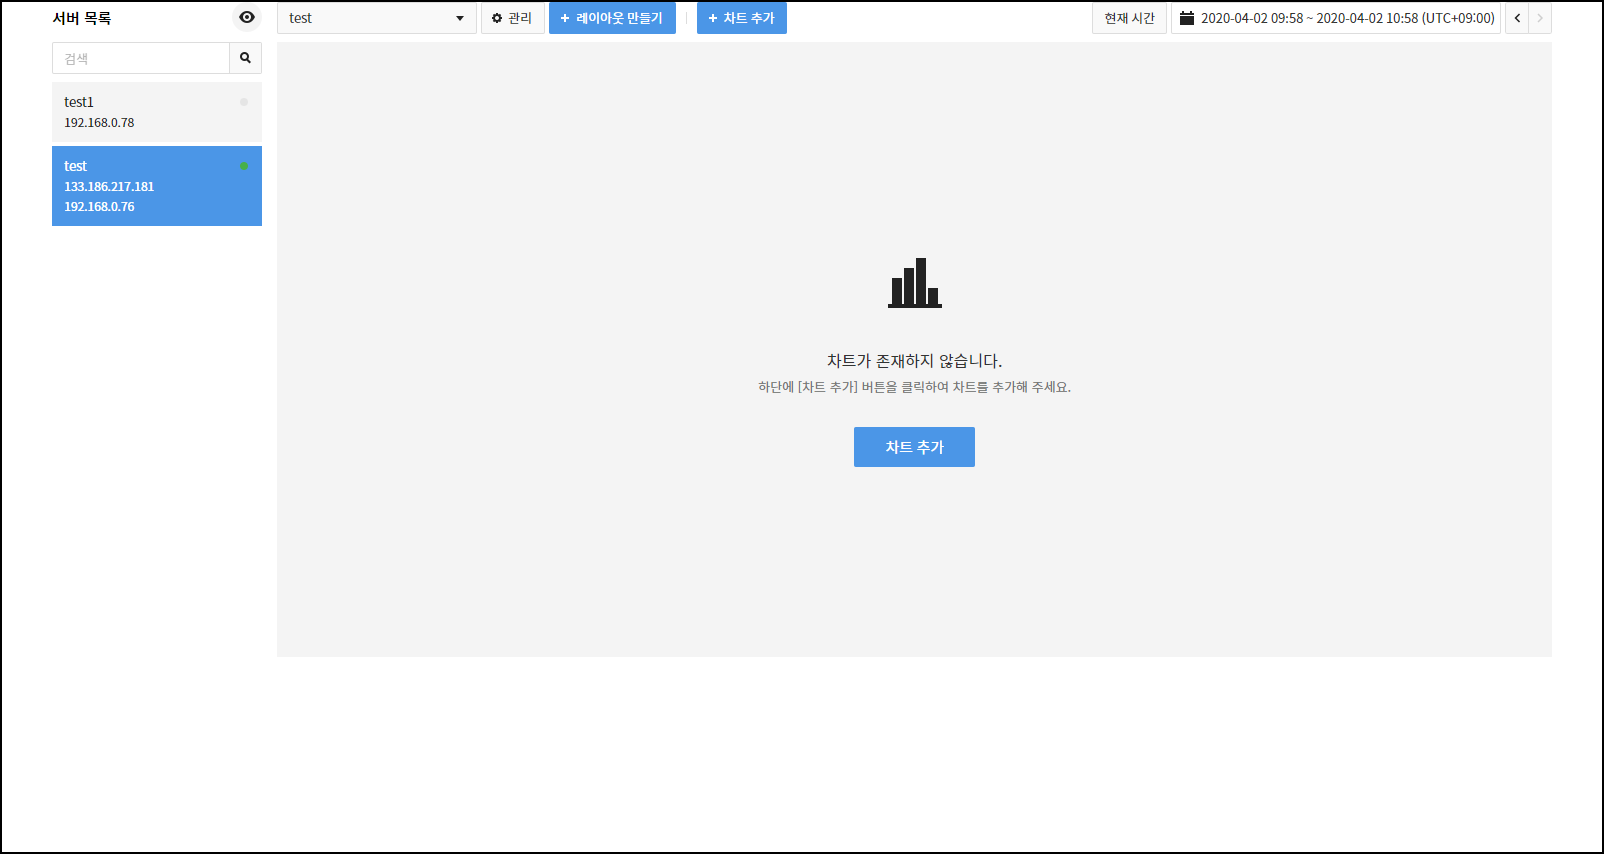
Select a layout, click Add Charts, and a pop-up to add more charts shows up.
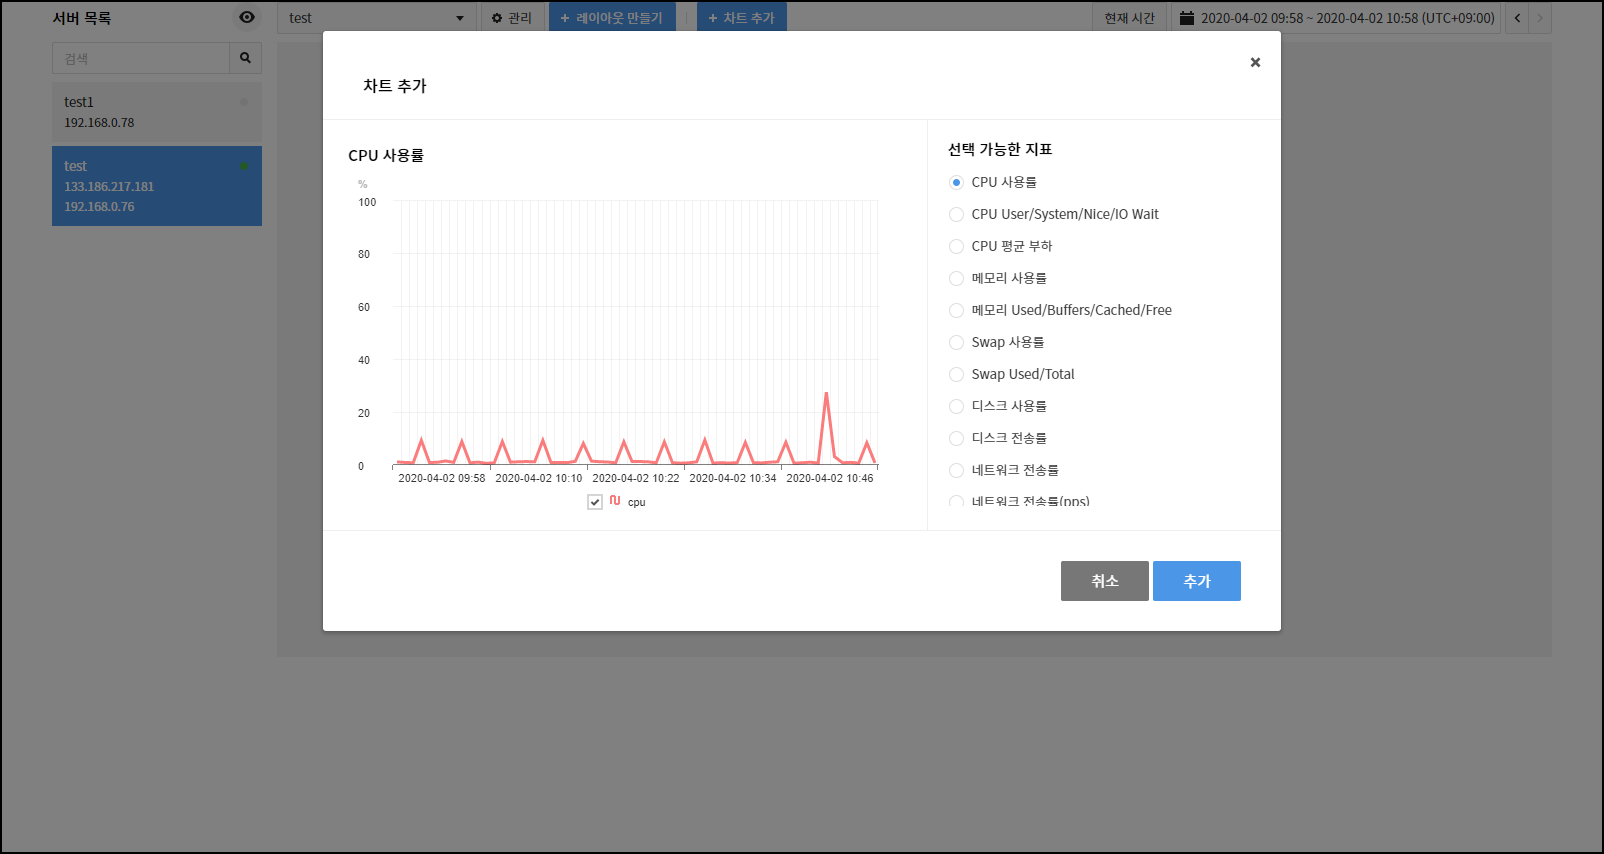
With more charts added, you can find them on the layout.
Charts on a user layout are free to be modified in the layout or size.
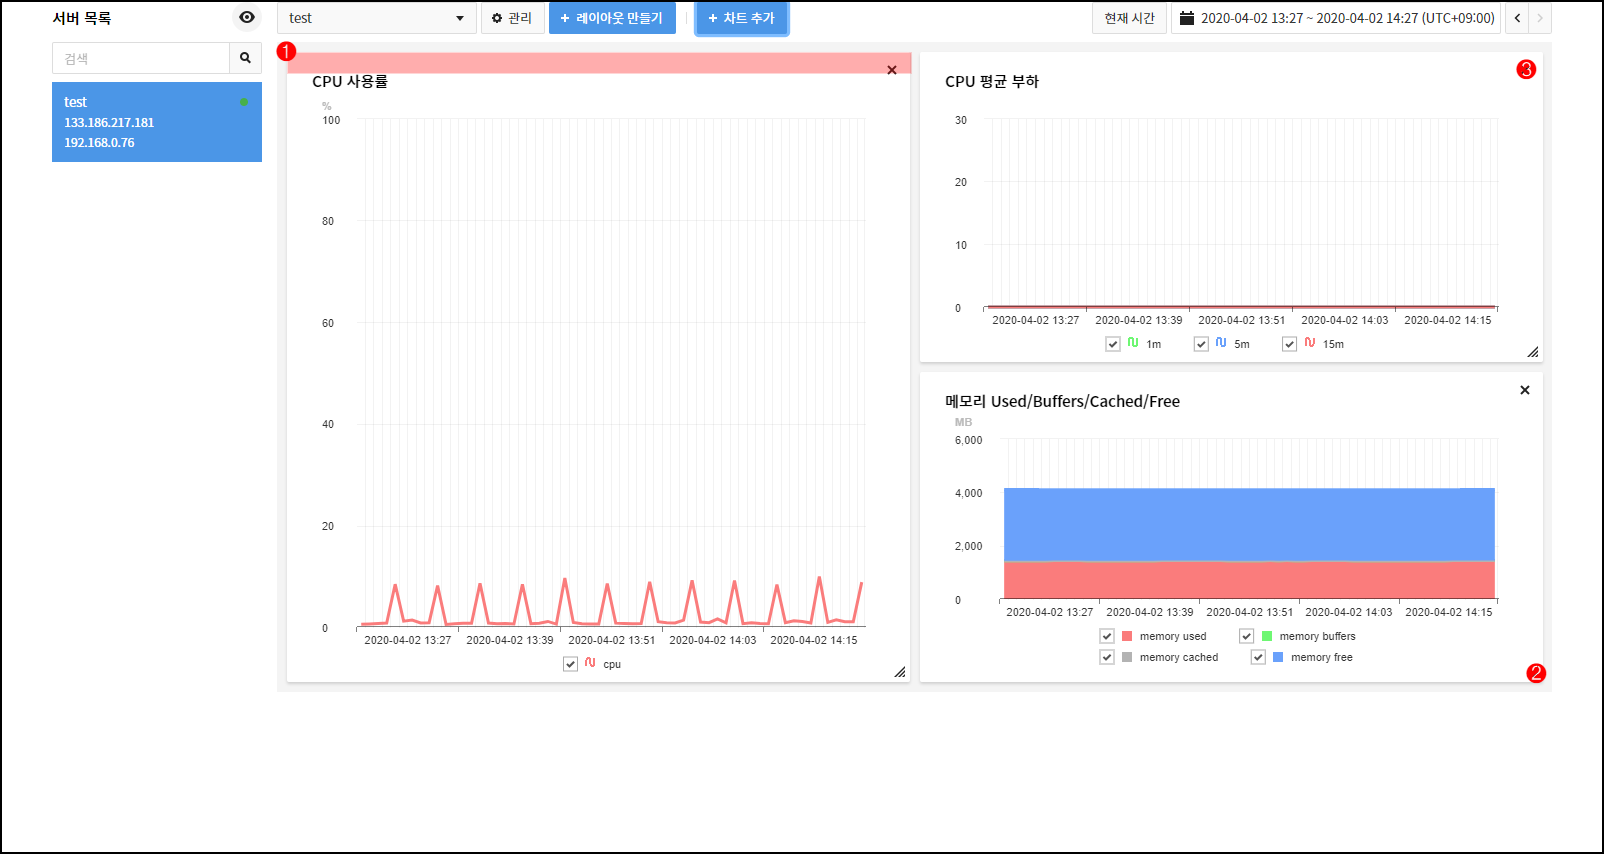
- ❶ Area 1 can be re-located with a drag & drop.
- ❷ To change the size, drag and drop the bottom right area.
- ❸ Added chart can be deleted.
Notification Group
In the Notification Group tab, a notification group can be created and deleted. In addition, monitoring target, user group, and monitoring settings can be added, modified and deleted in the notification group. Refer to notification group for more details regarding notification group.
Create a Notification Group
Click the + Create Group button at the top of the notification group list and a pop-up will be displayed to create a notification group.

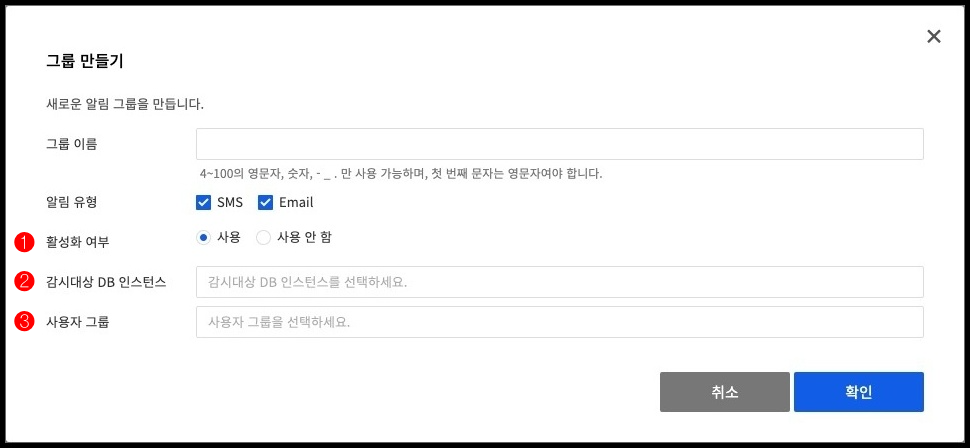
- ❶ Choose whether to enable or disable the notification group.
- Notifications will not be received when disabled.
- ❷ Select the DB instance to monitor.
- Supports Autocomplete input.
- Only DB instance that is available, failed connection, and have insufficient storage can be selected.
- Only DB instance that is available, failed connection, and have insufficient storage can be removed from the monitored DB instance.
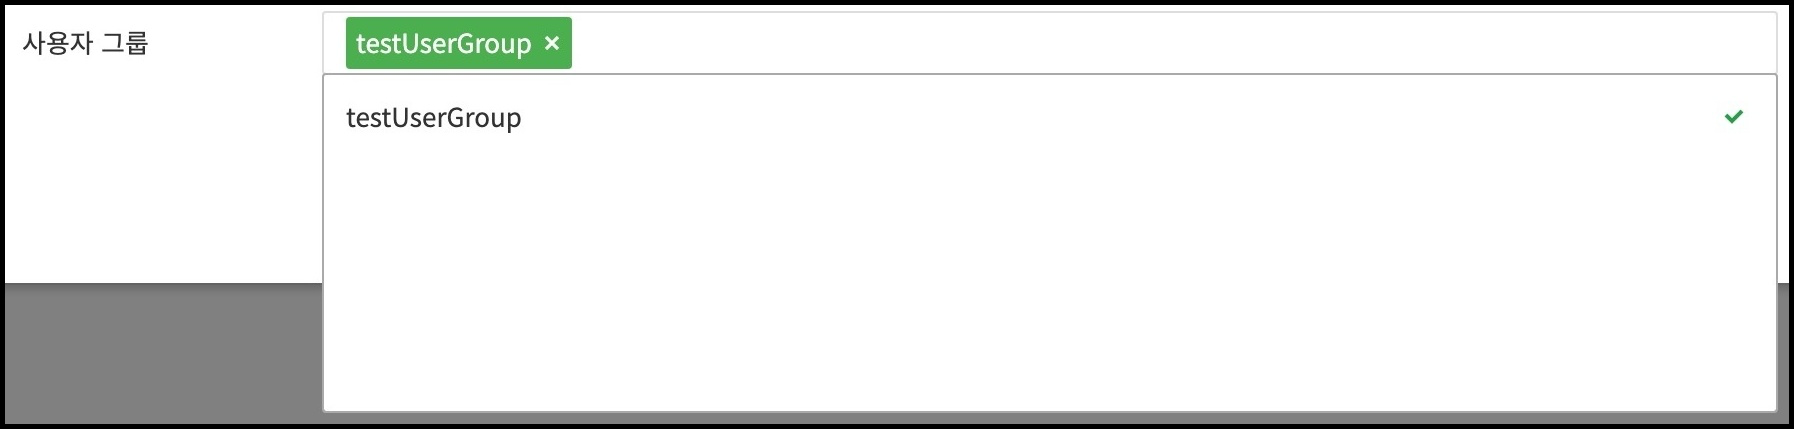
- ❸ Select the user groups to be notified when the event occurs.
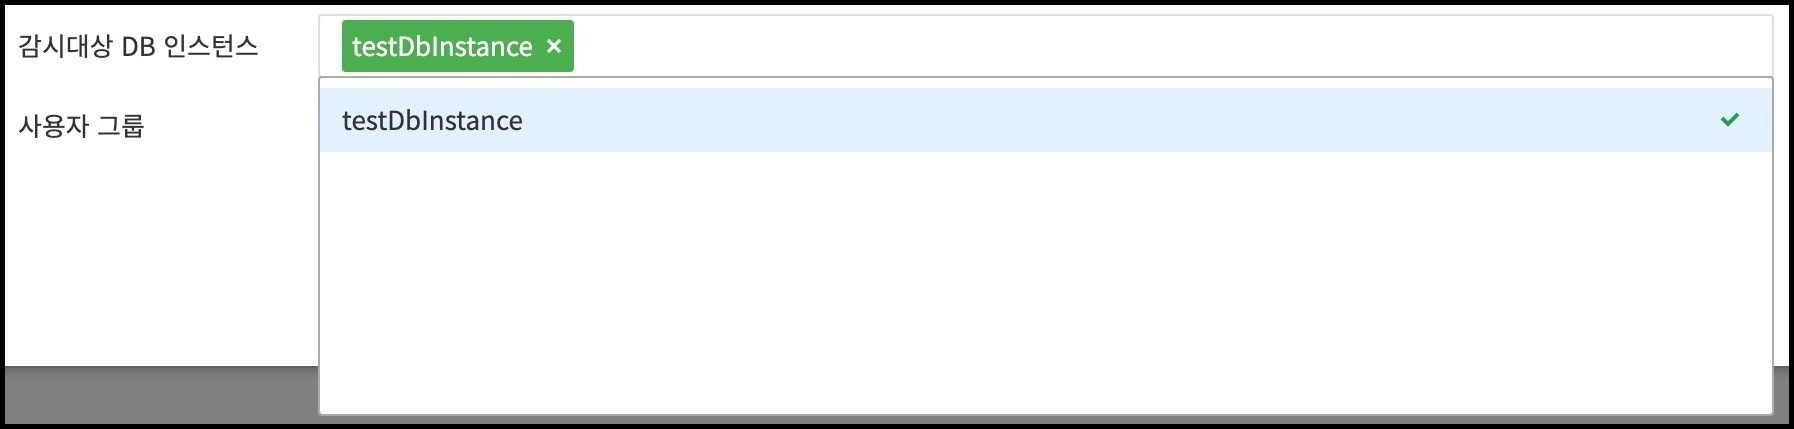
- Supports Autocomplete input.
Click the OK button at the bottom of the pop-up to create the notification group.
Modify a Notification Group
In the notification group list, click the Edit button at the right of the notification group to modify.

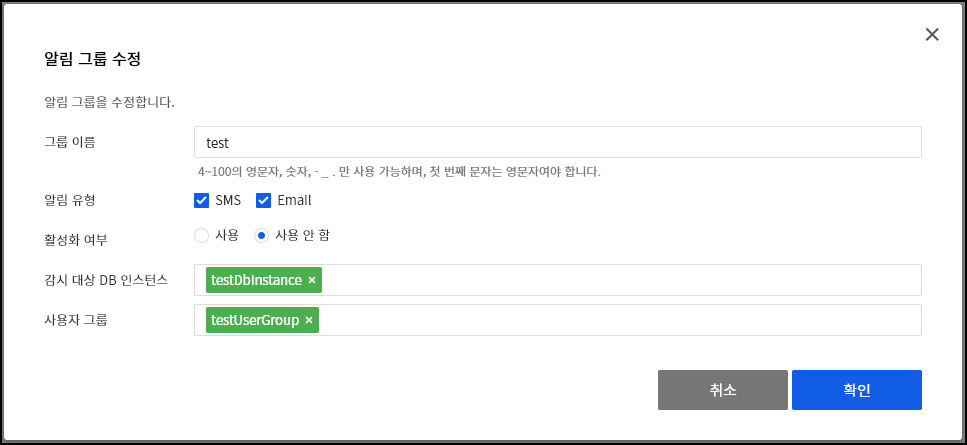
- Same as creating a notification group, the name, notification type, whether to enable or disable, monitoring target DB instance, and user group can be modified.
Notification Group Monitoring Settings
In the notification group list, click the Monitoring Settings button at the right of the notification group to set to monitor.
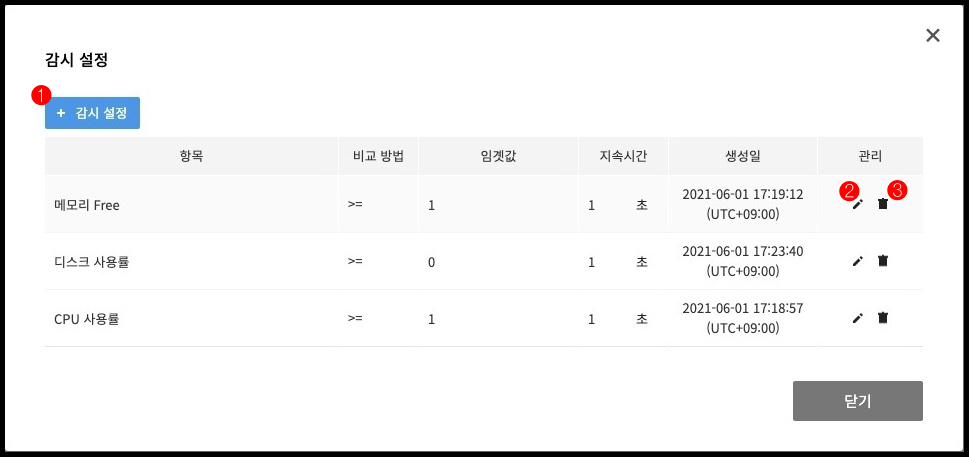
- ❶ New monitoring settings can be added by clicking the + Monitoring Setting button.
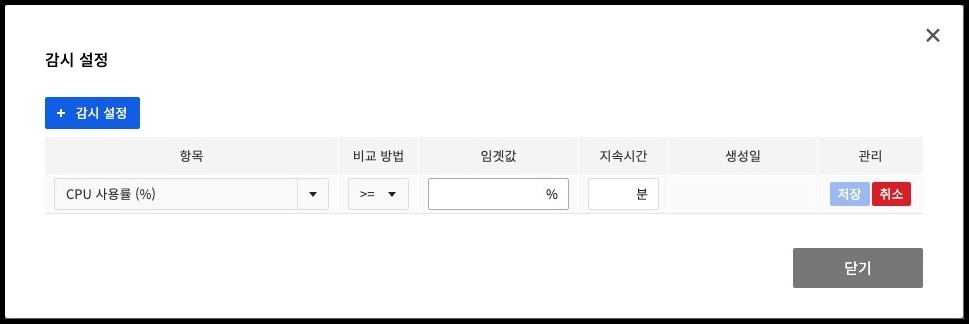
- The threshold can be set to a value between over 0 and below 100.
- The duration can be set to a value between over 0 and below 32,767.
- ❷ Click the button to modify the default monitoring settings.
- ❸ Click the button to delete the monitoring settings.
User Group
In the User Group tab, a notification group can be created and deleted. In addition, the user list can be added, modified, and deleted in the user group.
Create a User Group
Click the + Create User Group at the top of the user group list and a pop-up will be displayed to create a user group.

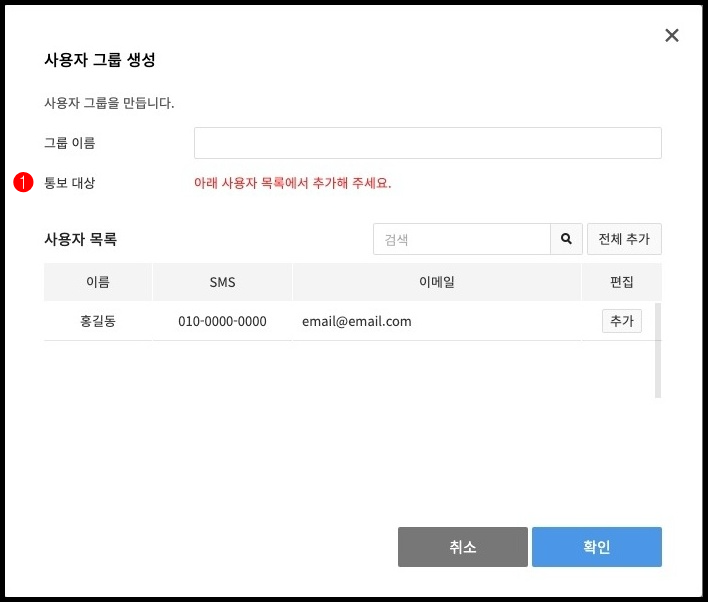
- ❶ Add or delete notification target.
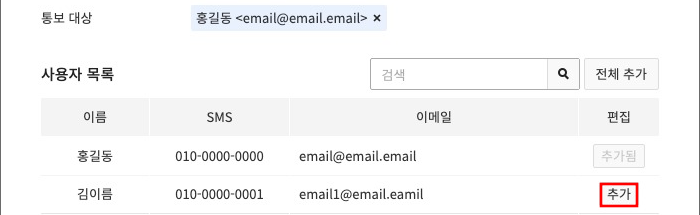
- Click the Add button on the right of the user to add as a notification target.
- Click the x button on the right of the user’s name to remove it from the notification target.
- Only the project members are displayed on the user list. Only the users who completed verification have their name and SMS displayed in addition.
Click the OK button at the bottom of the pop-up to create a user group.
Modify a User Group
In the user group list, click the Edit button at the right of the user group to be modified.
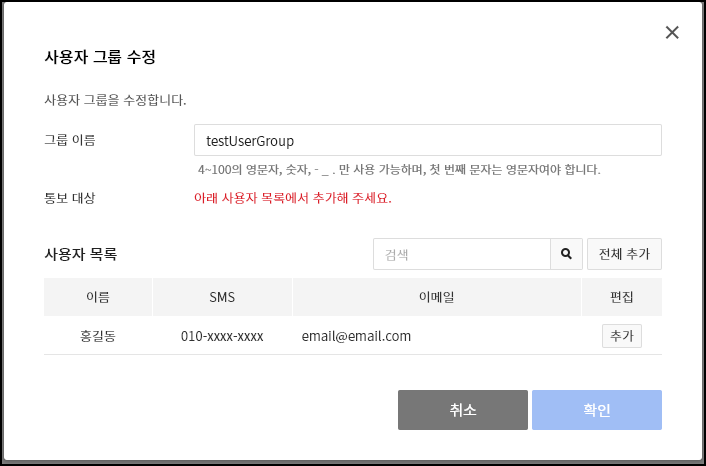
- Same as creating the user group, the name and notification target can be modified.
Scheduled Tasks
You can register a scheduled task when modifying a DB instance, changing a parameter group, or using high availability auto recovery.
List of Scheduled Tasks
You can check the scheduled tasks for the selected DB instance. A list of up to 50 scheduled tasks appears on a screen.

- ❶ If you click the Condition button, you can filter the results by scheduled task status.
- 'All' searches for all status values other than Deleted.
- ❷ Click Edit to change the time set for the scheduled task.
- ❸ Click Run Immediately to change the time for the scheduled task to the current time.
- ❹ Click Delete to delete a scheduled task.
- You can delete scheduled tasks with status 'Scheduled', 'Registered', 'Canceled', 'Error', and 'Verification Failed'.
- If you delete a scheduled task with 'Scheduled' or 'Registered' status, the task will not be executed.
Edit a Scheduled Task
In the list of scheduled tasks, click the Edit button on the right of the scheduled task you want to modify.
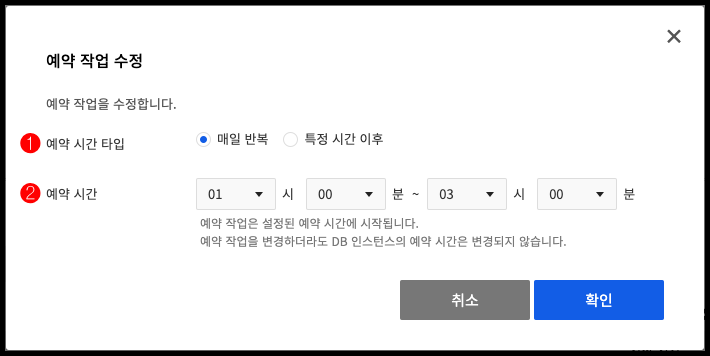
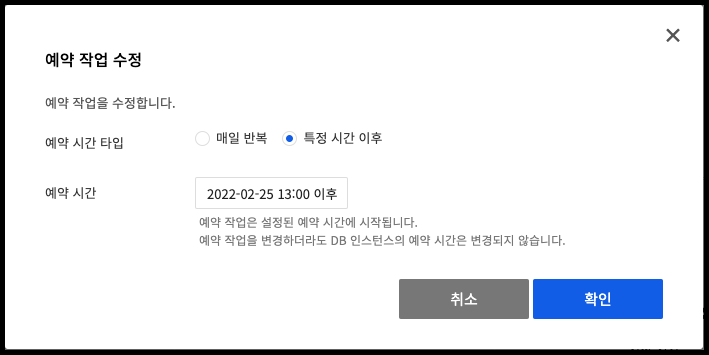
- ❶ You can set the schedule time type.
- Repeated Daily
- The system tries starting a scheduled task every day at the set time.
- If the task fails to start because another task is in progress, the task is tried again the next day.
- After Specific Time
- The system attempts to start the task after a specific time.
- If there is another task in progress, the task starts after the running task is completed.
- Repeated Daily
- ❷ Set the reservation time.
- Repeated Daily
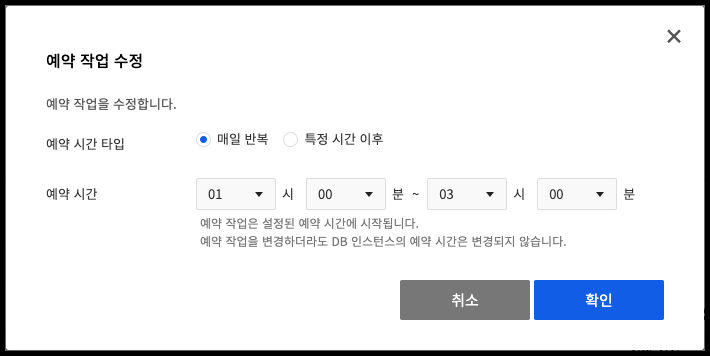
- The time interval must be set to at least 30 minutes.
- After Specific Time
- Repeated Daily
Run a Scheduled Task Immediately
In the list of scheduled tasks, click Run Immediately on the right of the scheduled task you want to run. Running the scheduled task immediately changes the schedule time to the current time. If there is a task currently in progress, it will start after completion of the task.
Delete a Scheduled Task
In the list of scheduled tasks, click Delete on the right of the scheduled task you want to delete. You can delete scheduled jobs with status 'Scheduled', 'Registered', 'Error', 'Canceled' or 'Verification Error'. If you delete a scheduled task with 'Scheduled' or 'Registered' status, the task will proceed.
Appendix 1. DB Instance Migration Guide for Hypervisor Maintenance
NHN Cloud periodically updates the hypervisor software of the DB instance to improve security and stability. DB instances running on a hypervisor that requires maintenance must be migrated to the hypervisor where maintenance has been completed.
You can start DB instance migration from the NHN Cloud console. Follow the guide below to use the migration feature in the console. First, go to the project where the DB instance requiring maintenance is located.
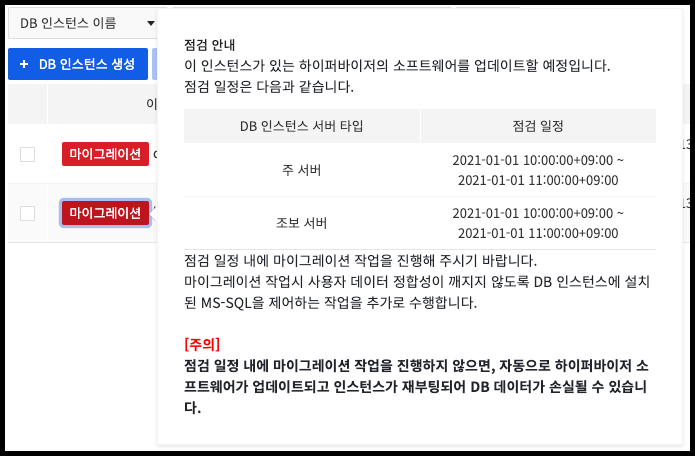
1. Check the DB instance that requires maintenance.
A DB instance with a Migrate button next to its name is the instance that requires maintenance.

You can check the detailed maintenance schedule by hovering the mouse cursor over the Migrate button.
2. Stop applications connected to the DB instance that requires maintenance.
Take appropriate measures not to affect services connected to the DB. If there is no way to do so without affecting the services, please contact the NHN Cloud Customer Center and we will guide you through the appropriate action.
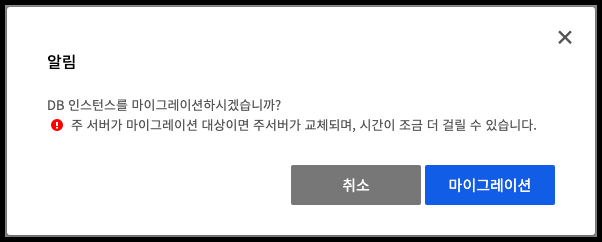
3. Request migration of the DB instance that requires maintenance.
Click the Migrate button next to the DB instance that requires maintenance. When a confirmation window appears, click the Migrate button.
4. Wait for the DB instance migration to finish.
If the status of DB instance does not change, try clicking the 'refresh' button.

No operations can be performed on the DB instance while migration is in progress. If the DB instance migration is not completed normally, it is automatically reported to the administrator, and NHN Cloud will contact you.
Table of Contents
- Database > RDS for MS-SQL > Console User Guide
- DB Instances
- Create a DB Instance
- List of DB Instances
- Restart a DB Instance
- Force Restart a DB Instance
- Modify a DB Instance
- DB Instance Details
- Differential Backup to Object Storage
- Restore from Backup in Object Storage
- Backups
- List of Backups
- Create a Backup
- Export a Backup to Object Storage
- Restoration
- Restore using Backup
- Point-in-time Restoration
- Events
- List of Recent Events
- Subscribe to Events
- Parameter Groups
- Create a Parameter Group
- Modify a Parameter Group
- Compare Parameter Groups
- DB Security Groups
- Create a DB Security Group
- Modify a DB Security Group
- Modify Security Policies
- Server Dashboard
- How to Use User Layouts
- Notification Group
- Create a Notification Group
- Modify a Notification Group
- Notification Group Monitoring Settings
- User Group
- Create a User Group
- Modify a User Group
- Scheduled Tasks
- List of Scheduled Tasks
- Edit a Scheduled Task
- Run a Scheduled Task Immediately
- Delete a Scheduled Task
- Appendix 1. DB Instance Migration Guide for Hypervisor Maintenance
- 1. Check the DB instance that requires maintenance.
- 2. Stop applications connected to the DB instance that requires maintenance.
- 3. Request migration of the DB instance that requires maintenance.
- 4. Wait for the DB instance migration to finish.